In an era of increasing water costs and environmental concerns, capturing free rainwater from your roof can save money and reduce your reliance on municipal water supplies. Many homeowners overlook this simple, eco-friendly solution, but rain barrels offer an easy way to harvest water for gardening, car washing, or even household chores. If you're tired of high water bills or want to contribute to sustainable living, understanding and installing a rain barrel is a beginner-friendly project that pays off quickly.
In this guide, you'll first learn what rain barrels are, how they work, and their benefits. Then, we'll walk through the installation process with clear, actionable steps. No advanced skills are needed—just basic tools and a bit of time. By the end, you'll be equipped to set up your own system, potentially collecting hundreds of gallons of water each rainy season while keeping your yard greener without extra effort.
Expect the whole process to take 1-2 hours, depending on your setup, and it's suitable for beginners with some DIY comfort. Let's dive in and turn your gutters into a water-saving powerhouse.
▸What You'll Need
- •55-gallon plastic rain barrel (required; food-grade to avoid contamination)
- •Downspout diverter kit or elbow connector (required for redirecting water)
- •Overflow hose or pipe (required to manage excess water)
- •Screen or mesh filter for the inlet (required to keep out debris)
- •Drill with 1/2-inch bit (required for spigot installation if not pre-drilled)
- •Brass spigot (optional if not included with barrel)
- •Level and stand or cinder blocks (optional for elevation and stability)
- •Silicone sealant or plumber's tape (optional for leak-proofing connections)
Estimated Time: 1-2 hours
Difficulty: beginner
▸Step-by-Step Instructions
Step 1: Understand What a Rain Barrel Is
A rain barrel is essentially a large container, typically 50-100 gallons, placed under your home's downspout to capture rainwater flowing from your roof. It acts like a simple storage tank, preventing runoff that could cause erosion or flooding while collecting free water for later use. Think of it as a backyard reservoir—rain hits your roof, travels down the gutters, and gets funneled into the barrel instead of straight to the storm drain.
Why does this matter? In many areas, rainwater is soft and chemical-free, ideal for plants that don't need treated tap water. It reduces your water bill (up to 1,300 gallons per year from a 1,000 sq ft roof in a 1-inch rain) and helps the environment by easing pressure on stormwater systems. Expect to fill it partially or fully after moderate rain, depending on your roof size.
No installation yet—just grasp this concept to appreciate the setup ahead.
💡 Tips:
- •Visualize your roof's drainage path before buying to choose the right barrel size.
⚠️ Warnings:
- •Avoid using collected water for drinking without proper filtration, as roofs can pick up pollutants.
Step 2: Choose the Right Location
Select a spot near your downspout, ideally on level ground against your house or in a shaded area to prevent algae growth. The barrel should be within 2-3 feet of the downspout for easy connection, and ensure it's at least 5-10 feet from your home's foundation to avoid moisture issues.
This step is crucial because proper placement ensures efficient collection and easy access for use. You'll want it elevated slightly (on blocks) for gravity-fed dispensing, but for now, just mark the area. Expect to measure and clear any debris from the site.
Pro tip: Check local regulations—some areas require permits or have setback rules for water collection.
💡 Tips:
- •Opt for a corner spot to save yard space and reduce tripping hazards.
Step 3: Prepare Your Downspout
Measure the downspout height and cut it if needed using tin snips, leaving enough length to attach a diverter. Install a downspout elbow or diverter kit by sliding it over the existing pipe and securing with screws or clamps. This redirects water into the barrel during rain and allows overflow back to the original path when full.
Why it matters: Without this, water won't enter the barrel properly, defeating the purpose. Expect a snug fit; test by pouring water to ensure flow. It's a simple modification that takes minutes but enables the whole system.
If your downspout is PVC, use compatible connectors to avoid cracks.
⚠️ Warnings:
- •Don't cut too short—leave room for adjustments.
Step 4: Assemble the Barrel Components
Position the barrel under the downspout. Attach the inlet screen to the top opening to block leaves and debris—secure it with the provided clips. If your barrel has a pre-drilled hole, screw in the brass spigot at the bottom side using plumber's tape for a watertight seal; otherwise, drill a 1/2-inch hole about 2 inches from the base.
This setup ensures clean water entry and easy dispensing via hose. Why important? Debris can clog the system, leading to overflows or contamination. You'll see the barrel ready to catch water, with the spigot positioned for low-pressure output.
Seal any holes with silicone if leaks appear during a test fill.
💡 Tips:
- •Wear gloves when drilling to protect against plastic shards.
Step 5: Install Overflow Management
Connect an overflow hose to the barrel's side outlet (usually pre-drilled higher up). Route the hose away from your foundation, perhaps to a garden bed or drain. This prevents flooding when the barrel is full by diverting excess water safely.
Overflow is key for longevity—without it, water could back up and damage your home. Expect to secure the hose with zip ties. Test by filling the barrel partially to confirm flow.
In heavy rain areas, consider a larger overflow pipe for better drainage.
⚠️ Warnings:
- •Never let overflow direct toward your house foundation to avoid water damage.
Step 6: Elevate and Stabilize the Barrel
Place the barrel on a sturdy stand, cinder blocks, or platform to raise it 1-2 feet off the ground. Use a level to ensure it's even, then secure it if needed with straps to prevent tipping in wind.
Elevation allows gravity to help water flow out the spigot without a pump. It matters for usability—low barrels make dispensing awkward. Expect better access for watering cans or hoses.
For beginners, cinder blocks are cheap and effective; avoid soft soil that could shift.
💡 Tips:
- •Add non-slip pads under blocks for stability on uneven ground.
Step 7: Test the System
Connect a hose to the spigot and pour water into the top (or wait for rain) to check for leaks, proper flow, and overflow function. Adjust connections as needed and empty the barrel after testing.
Testing verifies everything works before relying on it. You'll confirm clean collection and no drips. This final check prevents surprises during actual use.
Monitor for a day if possible to spot slow leaks.
⚠️ Warnings:
- •Test in small amounts to avoid wasting water or creating mud.
▸Pro Tips
- •Paint the barrel a dark color to deter algae, but use non-toxic paint for water safety.
- •Connect multiple barrels in series for more storage capacity as you gain experience.
- •Use collected water on acid-loving plants like blueberries—it's naturally better than tap water.
- •Install in fall for winter readiness, but drain fully before freezes to prevent cracking.
- •Add a mosquito dunker (BTI tablet) to the barrel to keep breeding at bay without chemicals.
- •Label the spigot 'Rain Water Only' to avoid accidental potable use.
- •Harvest in stages: Use overflow water first for non-plants to maximize storage.
▸Common Mistakes to Avoid
- •Placing the barrel too close to the house, leading to foundation moisture—keep at least 5 feet away and direct overflow properly.
- •Skipping the inlet screen, allowing debris to clog the spigot—always install and clean it monthly.
- •Not elevating the barrel, making water dispensing difficult—use blocks for easy access.
- •Ignoring local laws, resulting in fines—check regulations before installing.
- •Overfilling without overflow, causing spills—ensure the hose is clear and directed safely.
▸Troubleshooting
Problem: Leaks at connections
Solution: Tighten fittings or apply silicone sealant; dry the area first for better adhesion. If persistent, replace the faulty part.
Problem: Algae growth inside the barrel
Solution: Shade the barrel with a cover and clean annually with a mild bleach solution (1:10 ratio). Add a dunker for prevention.
Problem: Slow water flow from spigot
Solution: Check for clogs from debris and flush the system. Ensure the barrel is elevated enough for gravity.
Problem: Barrel tips over in wind
Solution: Secure with straps to the stand or wall anchors. Choose a sheltered location if possible.
Problem: Water smells bad
Solution: Empty and scrub the barrel; avoid stagnation by using water regularly. When to seek help: If contamination is suspected, consult a water quality expert.
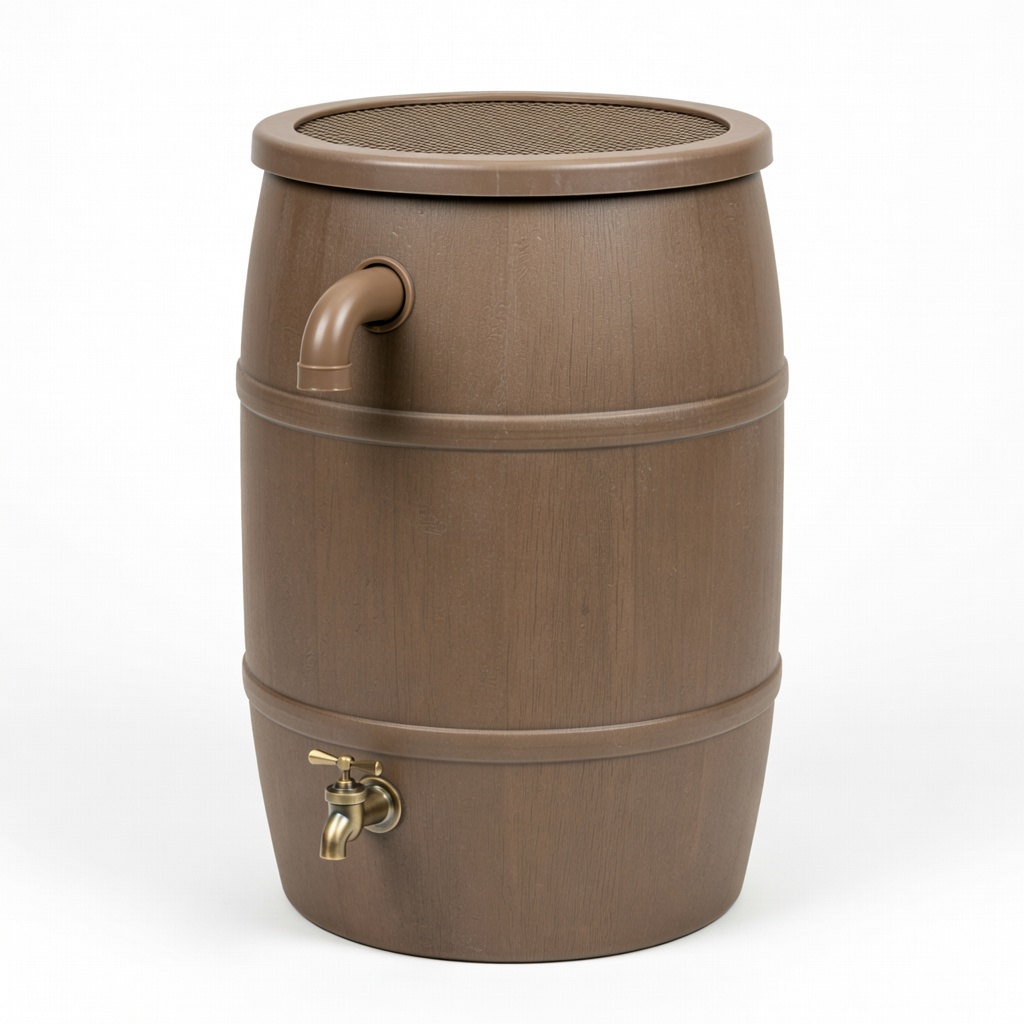
RTS Home Accents 50-Gallon Brown Plastic Rain Barrel
Durable, UV-resistant plastic that's easy to set up and blends with outdoor aesthetics; includes spigot and overflow.
Best for: Ideal for beginners wanting a complete kit for standard home roofs up to 1,000 sq ft.
Price Range: $80-$100
Good Ideas 65-Gallon Rain Wizard Barrel
Made from recycled materials with a flat-back design for wall placement; features built-in screens and brass fittings for longevity.
Best for: Great for space-limited yards or eco-conscious users needing higher capacity.
Price Range: $90-$110
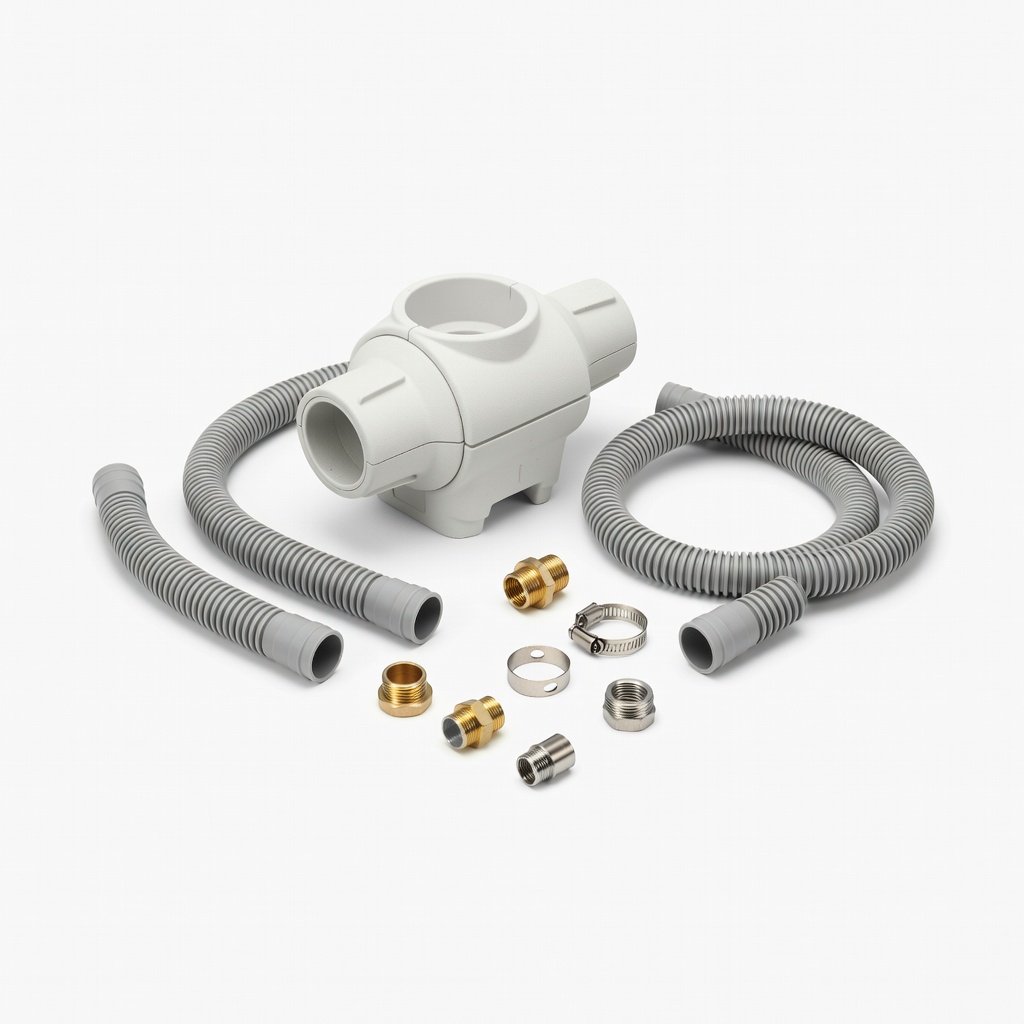
Rain Barrel Diverter Kit by Moen
Easy-to-install aluminum diverter that switches between barrel and downspout; weatherproof and no cutting required.
Best for: Perfect add-on for existing downspouts to enable quick rainwater redirection without permanent changes.
Price Range: $20-$30
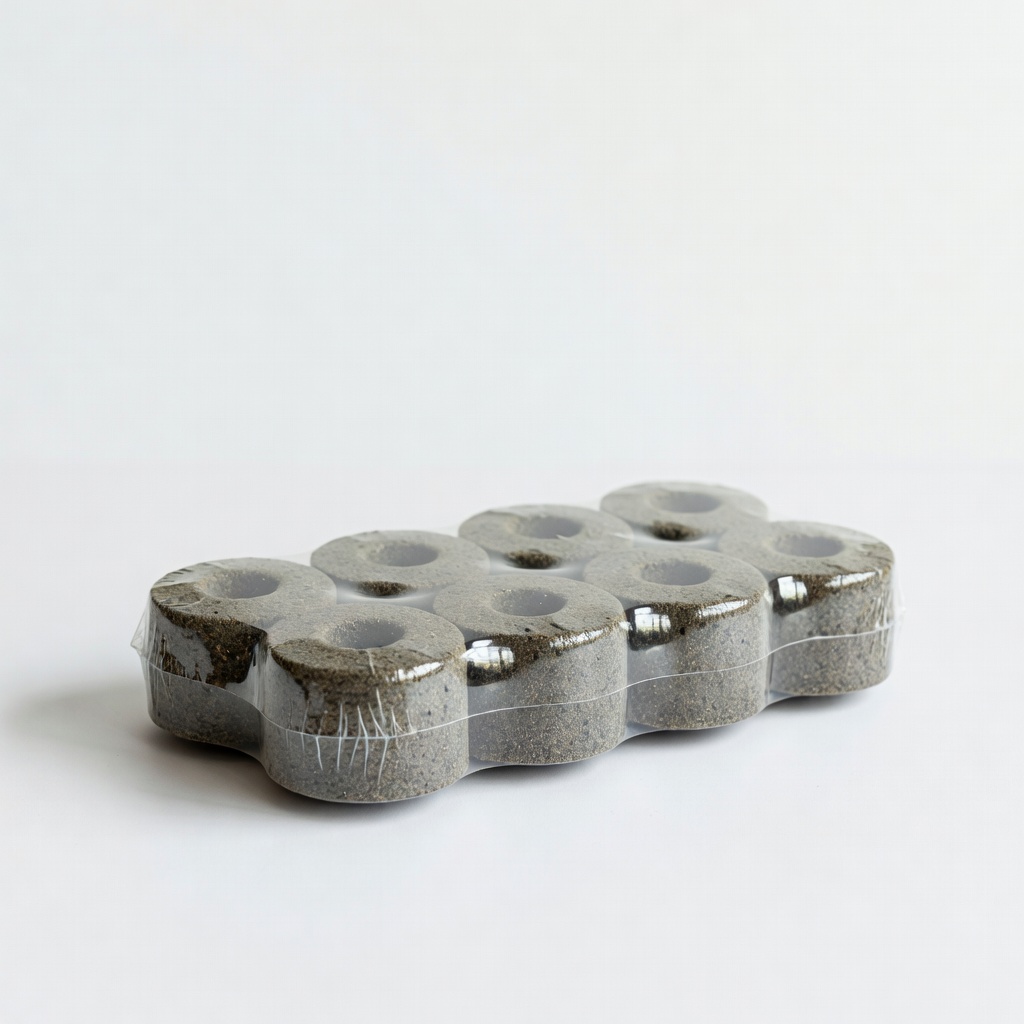
Eartheasy Mosquito Dunks (6-pack)
Contains BTI bacteria that kills mosquito larvae safely without harming water quality or plants.
Best for: Essential for preventing bugs in standing water, especially in warm climates.
Price Range: $10-$15
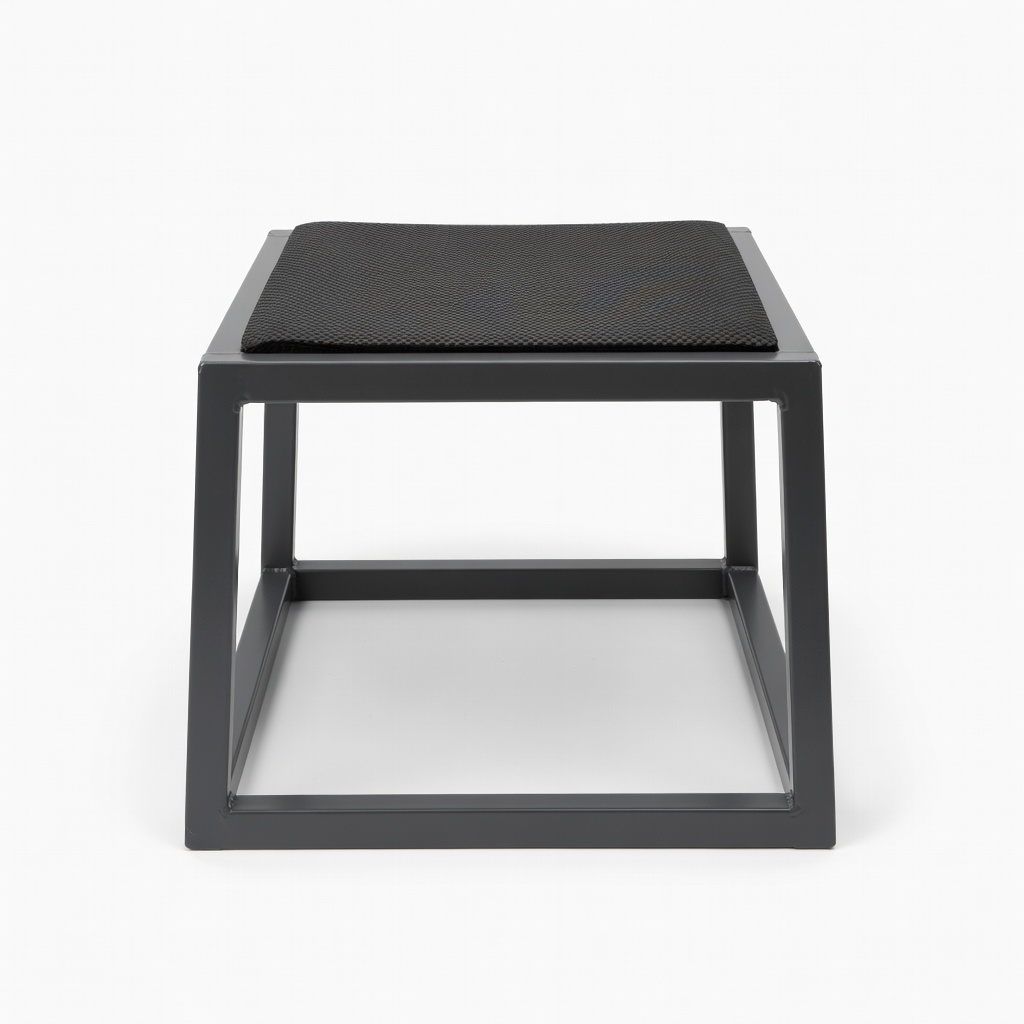
Cushion-Aire Rain Barrel Stand
Adjustable, recycled plastic platform that elevates barrels securely without tools; supports up to 400 lbs.
Best for: For stable elevation on uneven ground, improving dispensing ease.
Price Range: $40-$60