A digital multimeter is one of the most versatile tools in any toolbox, whether you're troubleshooting a car, working on electronics, or doing home electrical repairs. But for many beginners, it can look intimidating with its dial, numbers, and jacks. The good news is that using a multimeter is actually quite simple once you understand a few key concepts. In this guide, you'll learn the basics of measuring voltage, current, and resistance safely. You'll also discover common mistakes to avoid, troubleshooting tips, and product recommendations to help you get started. By the end, you'll be ready to make your first measurements with confidence. The whole process of learning these fundamentals should take about 20–30 minutes, and you don't need any prior experience.
▸What You'll Need
- •Digital multimeter (auto-ranging or manual)
- •Test probes (usually included with the multimeter)
- •Known DC voltage source (e.g., AA battery)
- •Known AC voltage source (e.g., wall outlet) – if you plan to test AC
- •Resistor or other component to test resistance (optional)
- •Alligator clip leads (optional, for hands-free testing)
- •Insulated safety gloves (recommended when working with mains voltage)
Estimated Time: 15-30 minutes
Difficulty: beginner
▸Step-by-Step Instructions
Step 1: Identify the Multimeter's Main Parts
A digital multimeter has three primary sections: the display (shows the reading), the dial (selects the measurement type and range), and the input jacks (where you plug the test leads). Most multimeters have at least three jacks: COM (common, black lead), VΩmA (voltage, resistance, and small current), and 10A (high current). Some also have a jack for measuring milliamps. Familiarizing yourself with these parts is the first step toward using the meter correctly. Turn the dial to off when not in use to save battery.
💡 Tips:
- •Check the symbols around the dial: V with a straight line = DC voltage, V with a wavy line = AC voltage, Ω = resistance, A = current.
⚠️ Warnings:
- •Never connect the probes to a live circuit when the dial is set to ohms (Ω) or with the test leads in the wrong jacks.
Step 2: Connect the Test Leads to the Correct Jacks
Always connect the black lead to the COM jack. The red lead goes into the VΩmA jack for measuring voltage, resistance, and small currents (up to around 200mA in most meters). For higher current measurement (above 200mA), move the red lead to the 10A jack. Many beginners make the mistake of leaving the red lead in the 10A jack when trying to measure voltage, which can short the meter or blow a fuse. After connecting the leads, turn the dial to the measurement type you need.
💡 Tips:
- •Use a multimeter with fused current inputs to protect against accidental overloads. Some multimeters have a built-in fuse for the 10A jack, while others don't—check your manual.
⚠️ Warnings:
- •Do not switch the dial while the probes are connected to a live circuit. Always power off the circuit or take the probes off before changing the dial.
Step 3: Set the Dial to Voltage (AC or DC)
Decide whether you are measuring AC (alternating current) or DC (direct current). Most battery-powered devices are DC; household outlets are AC. If you are unsure, start with AC and then switch to DC if the reading seems low. Set the dial to the appropriate voltage mode. If your multimeter is auto-ranging, it will adjust automatically. If it's manual, choose the largest range that's higher than your expected voltage (e.g., 200V for a 12V battery). For a beginner, auto-ranging is much easier, but manual meters are also easy once you understand ranges.
💡 Tips:
- •If you see a '1' on the display with nothing else, you're likely in manual range and the voltage exceeds the range. Turn to a higher range.
⚠️ Warnings:
- •Always use the correct mode (AC vs DC). Using DC in AC mode (or vice versa) can give a zero or inaccurate reading.
Step 4: Measure DC Voltage (e.g., Battery Test)
With the dial set to DC voltage, touch the black probe to the negative terminal and the red probe to the positive terminal of a battery. The display will show the voltage. If you reverse the leads, you'll see a negative sign, which is fine. A fully charged AA battery should read about 1.5V; a common 9V battery around 9V. This is a safe way to practice and verify your multimeter is working. To measure voltage in a live circuit, just touch the probes to two points with the power on—no need to break the circuit.
💡 Tips:
- •For a hands-free measurement, use alligator clips on the probes or attach them to a benchtop holder.
⚠️ Warnings:
- •Do not exceed the maximum voltage rating of your multimeter (often 600V or 1000V). Most household wiring is 120V AC, which is fine, but be cautious with high-voltage equipment.
Step 5: Measure AC Voltage (e.g., Wall Outlet)
If you're comfortable working with household electricity, you can measure AC voltage. Set the dial to AC voltage (V~). Insert the black probe into the neutral (wide slot) and the red probe into the hot (narrow slot) of an outlet. The reading should be around 110–120V in North America. Alternatively, you can use a non-contact voltage tester for safety. Remember: AC voltage has no polarity, so it doesn't matter which probe goes where. Always ensure your hands and probes are dry and that the multimeter is rated for the voltage you're testing (e.g., CAT III for mains).
💡 Tips:
- •If you're not sure which is hot and neutral, a multimeter can help identify them: the hot wire should show voltage to ground.
⚠️ Warnings:
- •Only test wall outlets if you're confident and use a meter with appropriate safety ratings. Never touch the metal parts of the probes while they're connected. If you're not comfortable, skip this step.
Step 6: Measure Resistance (Ω) and Check Continuity
Resistance measurement is for components that are not powered. Turn off the power to the circuit entirely. Set the dial to the resistance (Ω) or continuity mode (often a speaker icon). If your meter has a continuity mode, it will beep when the resistance is low (usually below a few ohms), indicating a completed connection. For resistance, touch the probes to both ends of a resistor or section of wire. The display will show the resistance in ohms (Ω), kilohms (kΩ), or megaohms (MΩ). This is useful for checking fuses, wires, and circuit boards. Important: never measure resistance on a live circuit—you'll get inaccurate readings or blow the meter's fuse.
💡 Tips:
- •For best accuracy, remove the resistor from the circuit if possible. Components in parallel or series can give unexpected readings.
⚠️ Warnings:
- •If the circuit has any voltage, do not measure resistance. It can damage the multimeter.
Step 7: Measure Current (A) in Series
Measuring current is more involved because you must interrupt the circuit and place the meter in series. Start by turning off the power and breaking the circuit at the point where you want to measure. Connect the black probe to COM, and the red probe to the 10A jack (or mA jack for small currents). Set the dial to the current range. Then insert the meter into the circuit: the current flows through the meter. Reapply power and read the current. This is common for measuring the draw of a motor or LED circuit. Many beginners find current measurement challenging, but it's a valuable skill.
💡 Tips:
- •When in doubt, start with the highest current range (10A) and then switch to a lower range for better resolution. Some multimeters have a separate amplifier for mA, so read the manual.
⚠️ Warnings:
- •Never connect the probes across a power source in current mode—this is a short circuit and will blow the meter's fuse or damage it. Always connect in series.
Step 8: Interpret the Reading and Safely Store Your Multimeter
Learn to decode the display: '0.5' might mean 0.5 volts, '5.0' might mean 5 volts, depending on the range selected. If the reading is 'OL' (overload), the value exceeds the current range—switch to a higher range. When you're done, turn the dial to the OFF position, disconnect the probes, and store the meter in a dry, cool place. Check the battery periodically; a low battery is the most common cause of inaccurate readings. If your meter has a fuse, consider having a spare on hand.
💡 Tips:
- •Read the display carefully—decimal points are easy to misread. Use the 'hold' button if you need to lock the reading.
⚠️ Warnings:
- •Never store the multimeter with the test leads connected to the jacks, as the tips could short out if they touch metal.
▸Pro Tips
- •Always start with the highest range on manual meters to avoid overload readings.
- •For resistance measurements, isolate the component from the circuit for accurate results.
- •Use the continuity mode to quickly check for broken wires and fuses.
- •If you're measuring low-resistance values, subtract the probe resistance (short the leads and note the reading) for better accuracy.
- •Take advantage of the auto-off feature to extend battery life if your meter has one.
- •For home electrical work, consider using a non-contact voltage tester to verify the circuit is off before you use your multimeter.
▸Common Mistakes to Avoid
- •Connecting the red lead to the current jack when measuring voltage—this can short the circuit. Always check the jack before touching probes to anything.
- •Leaving the dial in ohms mode when connecting to a live circuit—it can blow the fuse or damage the meter.
- •Measuring current in parallel instead of series—this creates a short circuit, often with sparks.
- •Using a meter that isn't rated for the circuit voltage—always check the CAT rating.
- •Ignoring a '1' on the display—it means the reading is out of range, not that the measurement is zero.
▸Troubleshooting
Problem: Multimeter shows 'OL' or '1'.
Solution: You're likely in manual mode and the reading exceeds the selected range. Switch to a higher range or use auto-ranging mode.
Problem: No reading when measuring voltage.
Solution: Check that the dial is set to the correct voltage type (AC/DC) and that the red lead is in the VΩmA jack, not the 10A jack. Confirm your battery isn't dead.
Problem: Continuity beep doesn't sound.
Solution: Check you're in the correct mode and that the probes are making good contact. If the resistance is above the threshold, it won't beep—test a short piece of wire to verify.
Problem: Current reading shows zero.
Solution: Ensure the meter is connected in series (break the circuit) and that the red lead is in the 10A jack for high currents. Also, verify the circuit is actually carrying current.
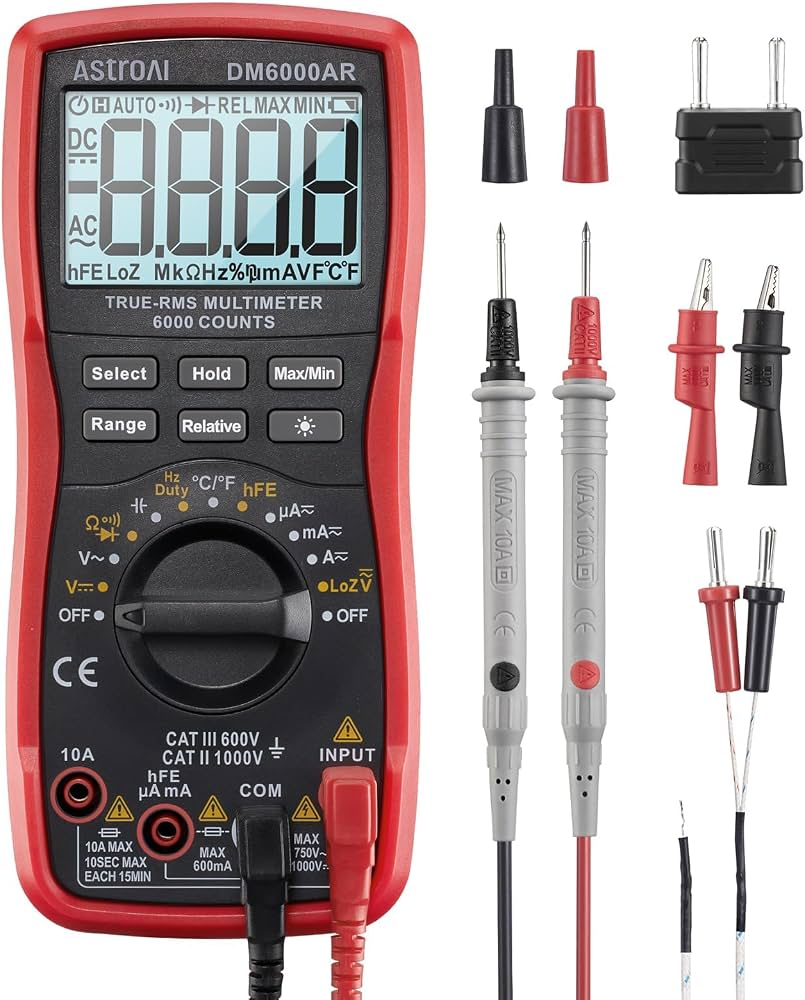
AstroAI Digital Multimeter
An affordable, beginner-friendly option with Auto-ranging, DC/AC voltage, and continuity functions. It's widely praised for its clear display and included test leads.
Best for: Perfect for home DIY, hobby electronics, and automotive checks.
Price Range: $20-$40
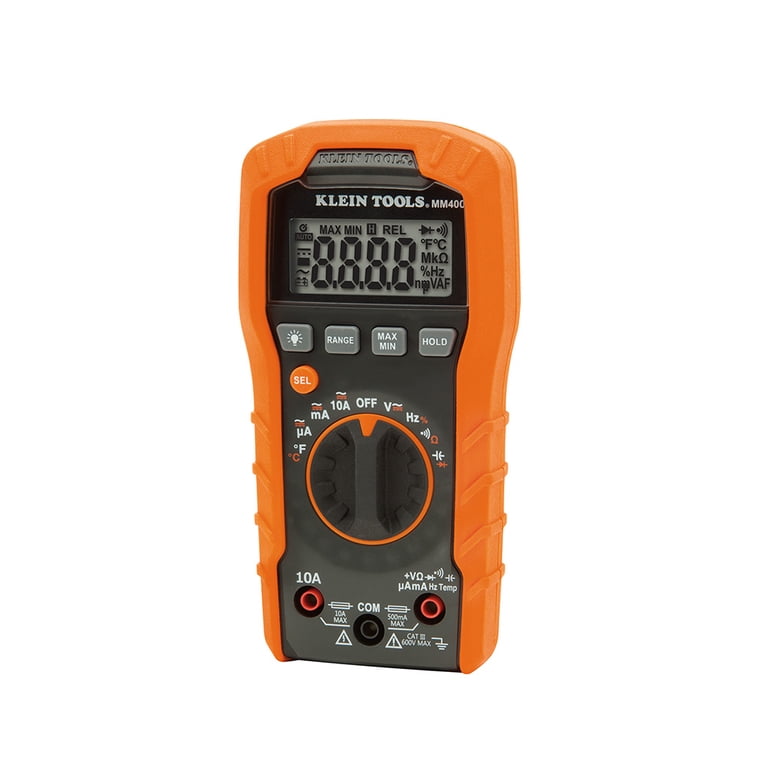
Klein Tools MM400 Multimeter
A durable and reliable manual-ranging multimeter from a trusted name in electrical tools. Offers CAT III safety rating and a large, easy-to-read display.
Best for: Suitable for electricians and homeowners who need a dependable meter for wiring and appliance testing.
Price Range: $50-$70
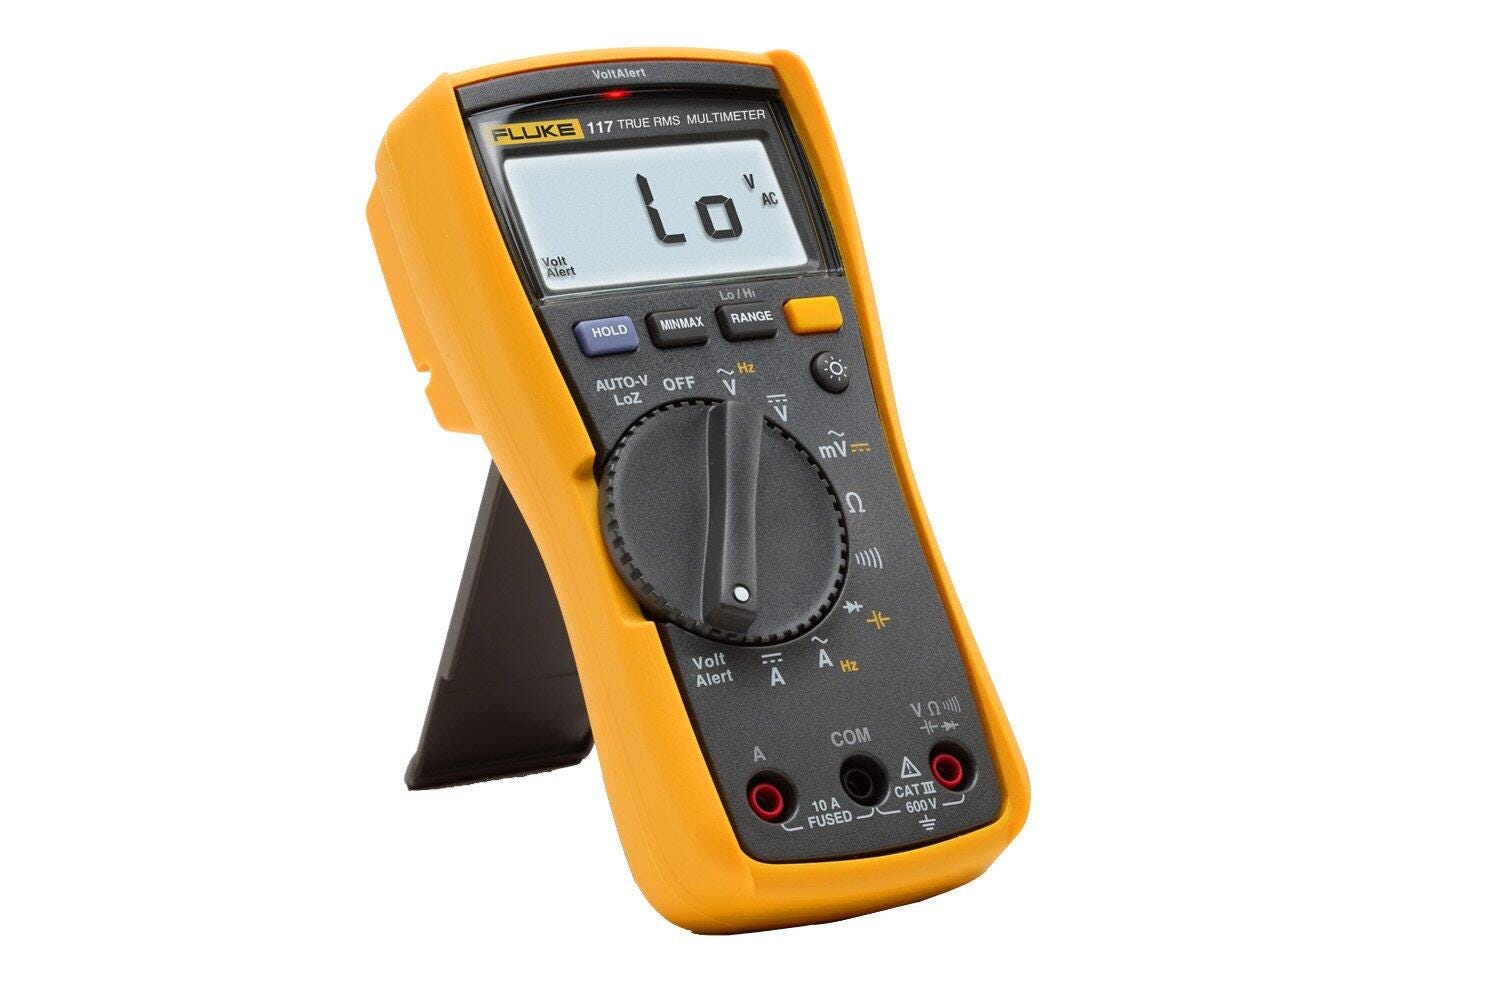
Fluke 117 True RMS Multimeter
A professional-level multimeter that provides accurate True RMS readings and has AutoVolt functionality. Built for serious electrical work and safety.
Best for: For advanced users, electricians, and technicians working on variable-speed drives or sensitive electronics.
Price Range: $150-$200
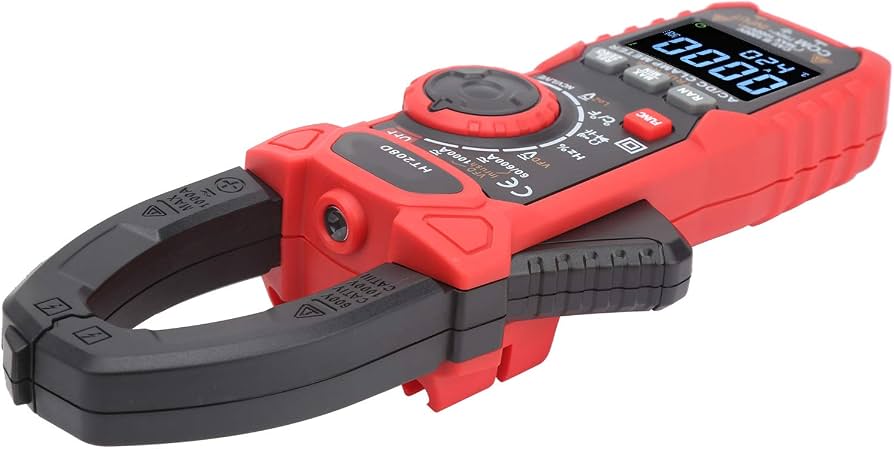
Kaiweets Digital Clamp Meter
A clamp meter combines a multimeter with a current clamp, allowing you to measure AC current without breaking the circuit—great for troubleshooting appliances and panels.
Best for: Ideal for measuring current in thick wires where making a series connection is difficult.
Price Range: $30-$60