Struggling with scattered toys and messy play areas? An activity and entertainment table provides a dedicated space for crafts, games, and imaginative play, keeping your home tidy while sparking creativity. Perfect for beginners, this guide walks you through assembly step-by-step.
You'll learn everything from unboxing to final safety checks, using common tools. No prior experience needed—the process is straightforward and rewarding. Expect a sturdy, multi-functional table ready for action in 30-45 minutes.
Whether it's a kids' craft table or game station, proper setup ensures longevity and safety. Let's get started!
▸What You'll Need
- •Activity table kit (e.g., KidKraft or Step2 model with parts list)
- •Phillips screwdriver (required)
- •Allen wrench (usually included, but extra recommended)
- •Stud finder (optional for wall proximity)
- •Non-slip furniture pads (optional for floors)
- •Clean, flat workspace (e.g., living room floor)
Estimated Time: 30-45 minutes
Difficulty: beginner
▸Step-by-Step Instructions
Step 1: Unbox and Inventory Parts
Carefully open the box using scissors or a box cutter, avoiding damage to the table components. Lay out all pieces on a clean, flat surface like carpet or a blanket to prevent scratches.
Sort parts into categories: legs, tabletop, screws/nuts, storage bins, and accessories. Compare against the included parts list or manual—most tables like KidKraft models have labeled bags. Success looks like all pieces accounted for, no missing hardware.
Why it matters: Missing parts lead to frustration; inventorying now saves trips to the store.
💡 Tips:
- •Take a photo of the sorted parts for reference.
- •Work in good lighting to spot small screws.
⚠️ Warnings:
- •Don't force pieces—check for defects immediately.
Step 2: Read the Instruction Manual
Review the full manual before starting. Note any specific tools or torque settings. Diagrams are usually clearer than words.
Identify your model—tables vary (e.g., Step2 water tables have drains, wooden ones have dowels). Mark steps you'll follow. Expect 10-20 pages with exploded views.
Pro tip: Manuals are model-specific; download extras from manufacturer sites if lost.
💡 Tips:
- •Highlight tricky steps.
- •Watch any included QR code video demo.
⚠️ Warnings:
- •Skipping this causes misalignment later.
Step 3: Assemble the Base and Legs
Attach legs to the base frame using provided screws and Allen wrench. Insert bolts through pre-drilled holes, hand-tighten first, then fully secure.
Most tables have 4-6 legs; align evenly for stability. Success: Base stands square without wobbling.
Why: Stable base supports the tabletop weight and kids' activity.
💡 Tips:
- •Use a power screwdriver on low speed to save time.
⚠️ Warnings:
- •Avoid over-tightening plastic threads—strip easily.
Step 4: Attach the Tabletop
Flip the base upright and position the tabletop. Align holes and secure with screws from underneath.
For dual-sided tables (e.g., chalkboard/craft side), ensure correct orientation. Test flip mechanism if applicable. Expect a snug fit.
Why it matters: Proper alignment prevents rocking during play.
💡 Tips:
- •Have a helper hold the top steady.
⚠️ Warnings:
- •Don't assemble on uneven floor—use level surface.
Step 5: Install Storage Bins and Drawers
Slide bins into slots or attach drawers with glides. Secure any latches or dividers.
Bins organize toys, crucial for entertainment tables. Success: Bins open smoothly without sticking.
Bonus: Label bins for crafts vs. games.
💡 Tips:
- •Lubricate glides with soap if sticky.
⚠️ Warnings:
- •Overload bins later—check weight limits (usually 5-10 lbs each).
Step 6: Add Accessories and Entertainment Features
Install extras like cup holders, trays, or play mats. For entertainment tables, attach game boards or Lego plates if included.
Tighten all final screws. Wipe down surfaces. Success: Fully equipped table ready for use.
Why: Features make it versatile for activities.
💡 Tips:
- •Save accessory bags for future moves.
Step 7: Test Stability and Position the Table
Shake gently, sit on edges, load with books/toys. Adjust legs if wobbly (some have levelers).
Move to final spot away from walls/outlets. Add non-slip pads. Success: Rock-solid, kid-height (usually 18-24 inches).
Final check: No sharp edges.
💡 Tips:
- •Place near natural light for crafts.
⚠️ Warnings:
- •Never place on carpet without pads—tripping hazard.
▸Pro Tips
- •Always assemble on carpet to protect surfaces and parts.
- •Keep kids/pets away during setup for safety.
- •Use painter's tape to pre-align screw holes.
- •Batch-screw: Tighten in stages for even pressure.
- •Personalize post-setup with contact paper for themes.
- •Store manual in a bin for quick reference.
- •Upgrade screws if originals are cheap (match size).
▸Common Mistakes to Avoid
- •Ignoring the manual—leads to backwards assembly and rework.
- •Over-tightening screws—strips threads, weakens joints.
- •Skipping stability test—table tips during use, injuring kids.
- •Assembling in tight spaces—hard to maneuver large pieces.
- •Forgetting non-slip pads—scratches floors, slides on hard surfaces.
▸Troubleshooting
Problem: Table wobbles after assembly
Solution: Loosen and re-tighten legs alternately; check for even floor or add shims/pads. Verify all screws secure.
Problem: Missing screw or part
Solution: Contact manufacturer (e.g., KidKraft support) with model number—free replacements common. Use hardware store match meantime.
Problem: Bins don't fit smoothly
Solution: Clean tracks, apply silicone spray or wax. Ensure no debris.
Problem: Top won't flip/lock
Solution: Check hinge pins seated fully; lubricate if stiff. Refer to manual diagram.
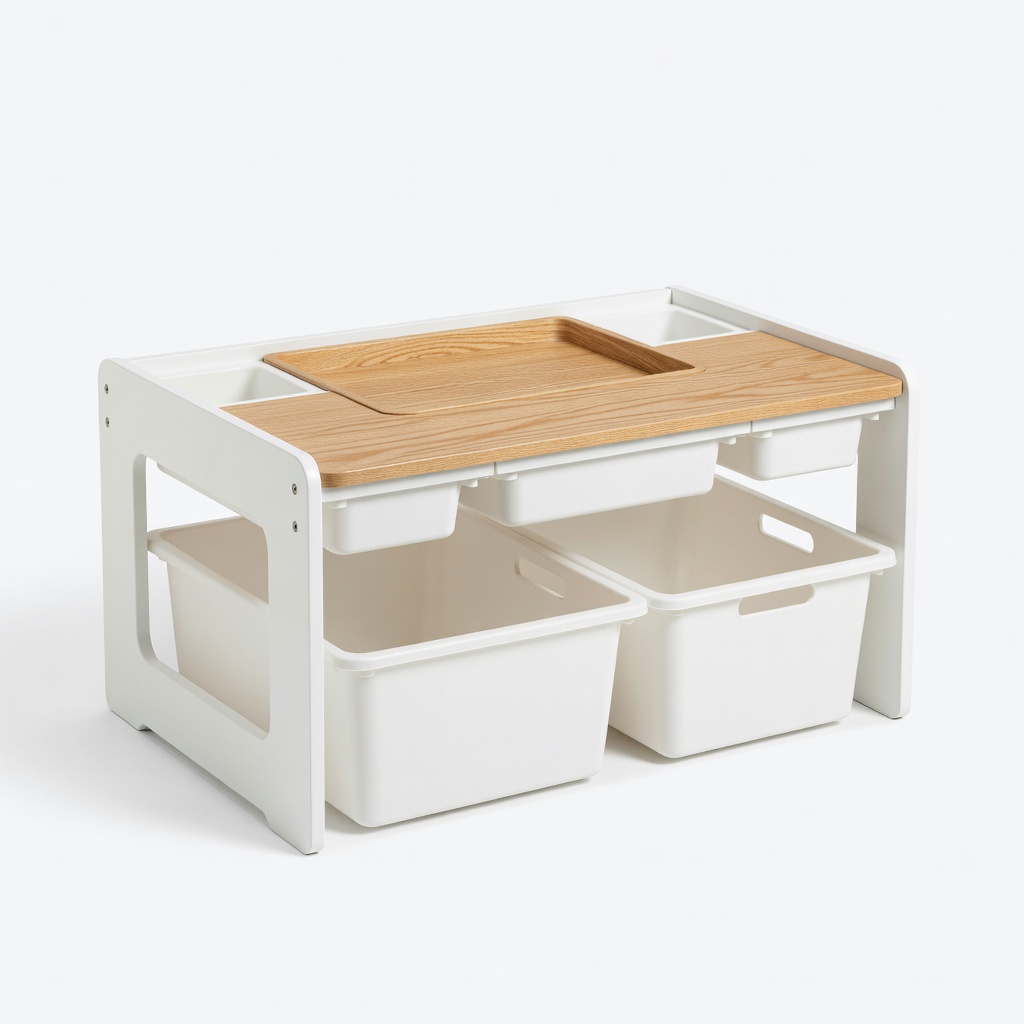
KidKraft Activity Table with Bins (ASIN: B07N1M8J5P)
Versatile wooden table with 3 storage bins, perfect for beginners—easy assembly with pre-drilled holes.
Best for: Daily crafts, toys, and games for ages 3+; holds up to active play.
Price Range: $90-$110
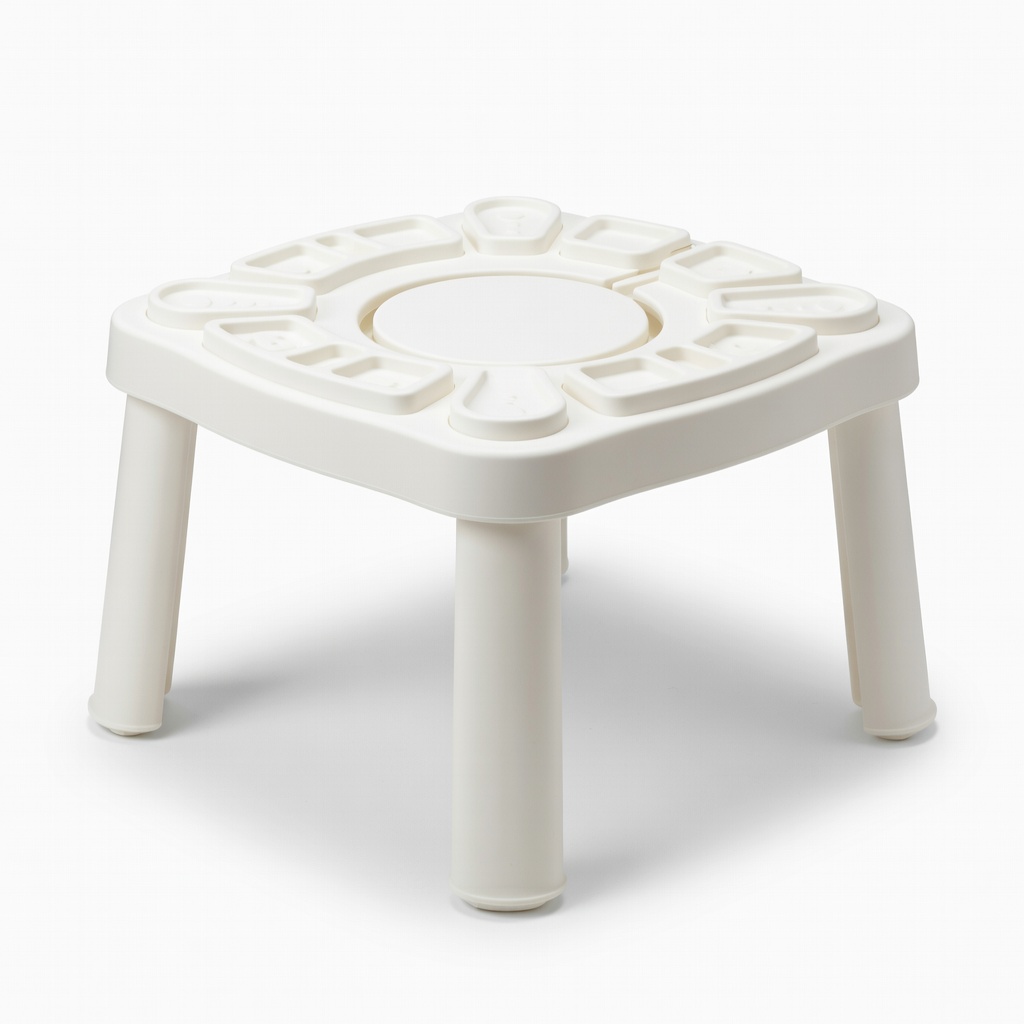
Step2 Sit & Play Jr. Activity Table (ASIN: B07G9J9Z3P)
Durable plastic design with water play option, tool-free assembly for ultra-beginners.
Best for: Indoor/outdoor entertainment, sensory play for toddlers.
Price Range: $50-$70
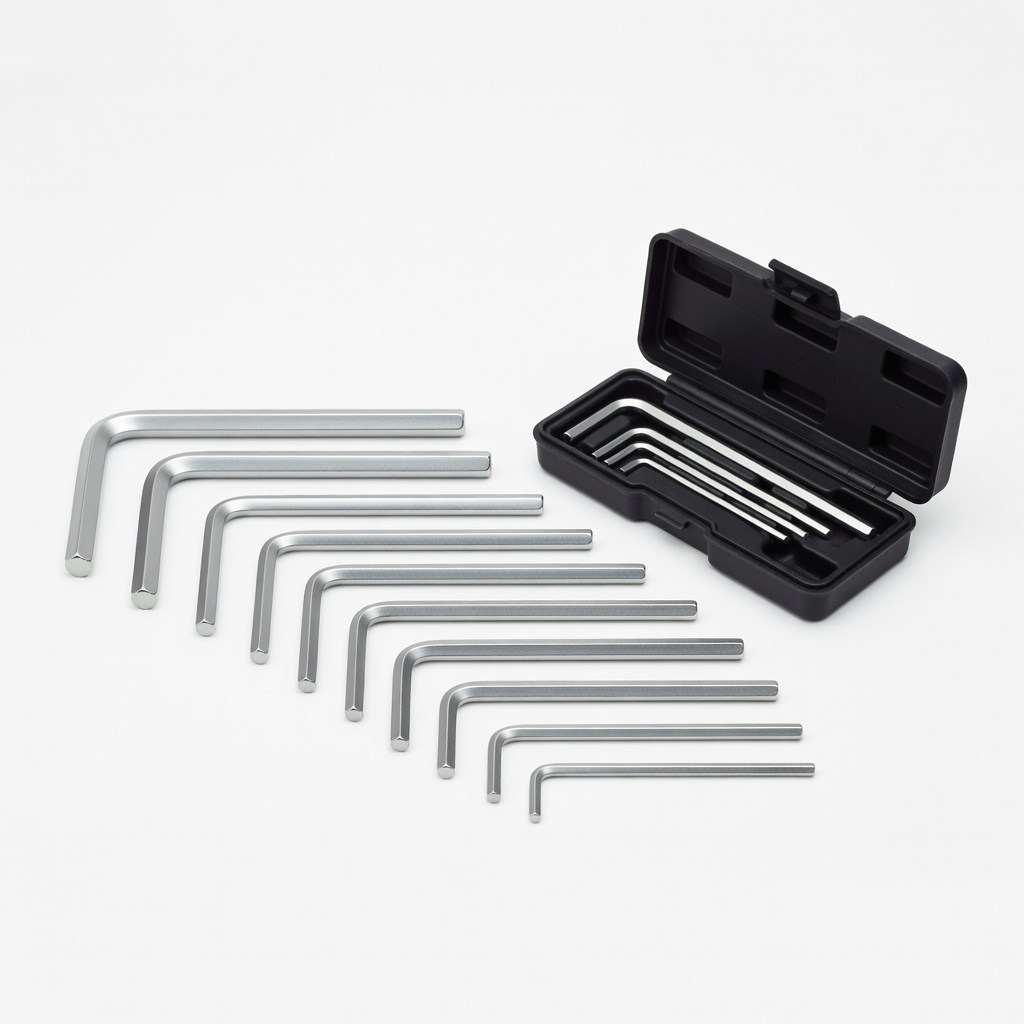
Amazon Basics 9-Piece Allen Wrench Set (ASIN: B00M7V8TII)
Precision-fit for table bolts, prevents stripping—cheaper than replacements.
Best for: Any furniture assembly; compact storage.
Price Range: $8-$12
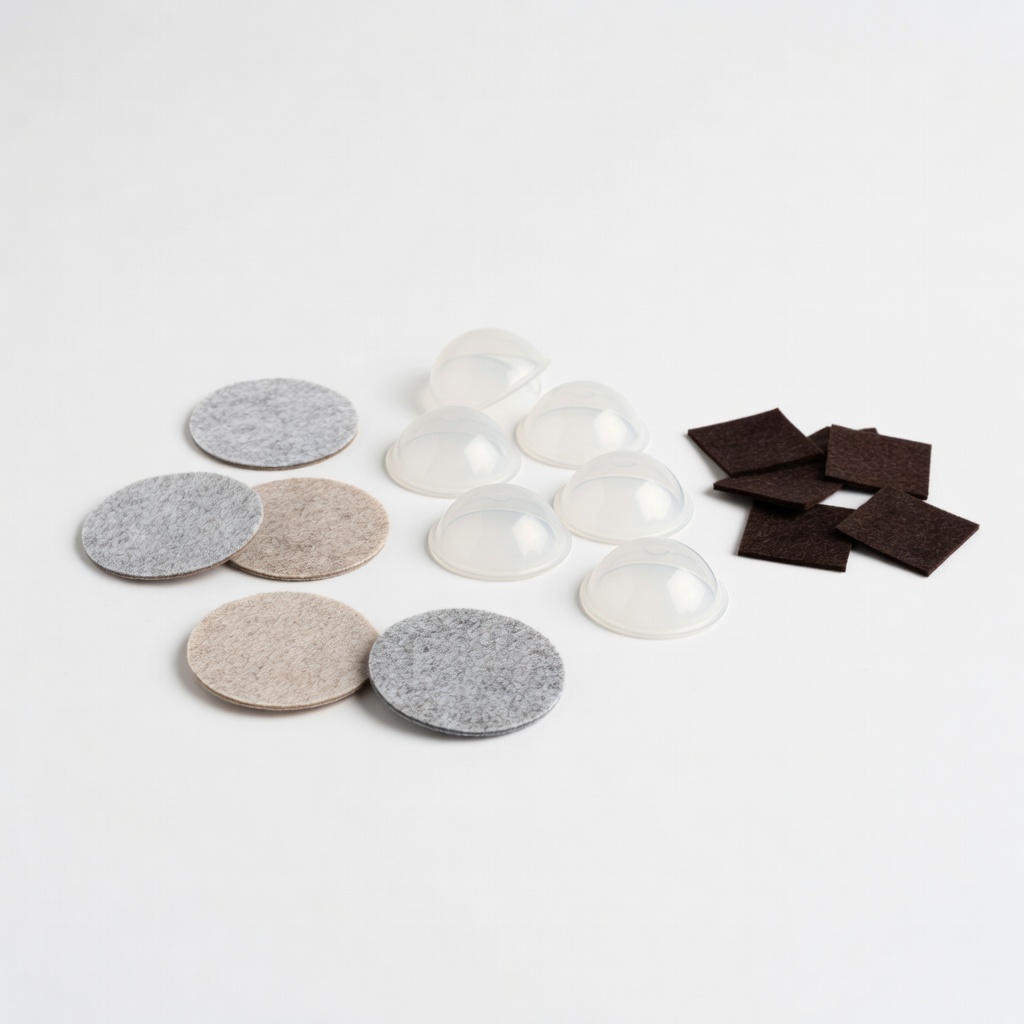
X-Protector Furniture Floor Protectors (ASIN: B07H4J4Q5R)
Anti-slip pads prevent sliding and scratches during/after setup.
Best for: Hardwood/tile floors with active kids.
Price Range: $10-$15
Ryobi 4V USB Screwdriver (ASIN: B08L5N6Q2R)
Cordless, lightweight power for faster tightening without fatigue.
Best for: Multiple assemblies or large tables.
Price Range: $30-$40