Garages often double as storage for household chemicals like gasoline, paints, and solvents, but improper storage can lead to devastating fires—accounting for over 15,000 garage fires annually in the US, per NFPA data. Without proper precautions, a single spark could ignite volatile fumes, endangering your home and family. This guide empowers you to create a safe storage system that prevents accidents and gives peace of mind.
You'll learn how to assess your materials, select and install fire-rated cabinets, organize items effectively, and maintain safety protocols. The process focuses on intermediate-level tasks like secure mounting and segregation, drawing from OSHA and fire safety best practices. Expect a straightforward setup that's practical for DIYers with basic tools.
This tutorial takes 1-2 hours total, depending on your garage size, and assumes intermediate skills like using a drill or level. By the end, your flammable materials will be contained, labeled, and compliant, minimizing hazards while maximizing garage space.
▸What You'll Need
- •Fire-rated flammable storage cabinet (required; 12-30 gallon capacity recommended)
- •Measuring tape and level (required for installation)
- •Drill and mounting hardware (screws, anchors; required for securing cabinet)
- •Heavy-duty shelving or trays (optional, for organizing inside cabinet)
- •Hazard labels and markers (required for identification)
- •Fire extinguisher (Class B rated; required for nearby placement)
- •Gloves and eye protection (required for handling materials)
- •Optional: Grounding wire kit for static-sensitive items like fuels
Estimated Time: 1-2 hours
Difficulty: intermediate
▸Step-by-Step Instructions
Step 1: Assess Your Flammable Materials
Begin by inventorying all flammable items in your garage, such as gasoline cans, paint thinners, aerosols, and propane tanks. Categorize them by type (liquids, gases, solids) and quantity to determine storage needs. This step ensures you select appropriate containment that matches local fire codes, like NFPA 30 for flammable liquids.
Why it matters: Overlooking small items like lighter fluid can lead to incomplete storage, increasing risks. Expect to spend 15-20 minutes listing everything on paper or a spreadsheet. Success looks like a complete list with notes on each item's flash point (ignition temperature) for informed decisions.
Tip: Use a phone app like 'Chemical Inventory' for easy tracking.
💡 Tips:
- •Prioritize high-risk items like gasoline first.
- •Check expiration dates to dispose of outdated materials safely.
⚠️ Warnings:
- •Avoid opening containers during assessment to prevent fume release.
Step 2: Choose a Suitable Storage Location
Select a cool, dry, well-ventilated spot in your garage, away from ignition sources like water heaters, electrical panels, or direct sunlight. Ideal placement is on a concrete floor, at least 3 feet from exits and 18 inches from walls for airflow. Ground the area if storing fuels to prevent static sparks.
This prevents heat buildup and easy access during emergencies. Measure the space (at least 24x18 inches for small cabinets) and ensure it's not prone to flooding. Success: A marked spot that's accessible yet isolated, reducing accident potential by 80% per safety experts.
Pro Insight: Garages in hot climates should avoid south-facing walls to minimize temperature fluctuations.
💡 Tips:
- •Use a moisture meter to confirm low humidity (<60%).
- •Install a garage fan nearby for extra ventilation.
⚠️ Warnings:
- •Never store near vehicles or appliances that could leak fuel.
Step 3: Select and Prepare the Storage Cabinet
Opt for a FM-approved or OSHA-compliant fire-rated cabinet designed for flammables, with self-closing doors and spill containment. Clean the cabinet interior with a non-sparking tool and line shelves with absorbent pads if needed. Verify it meets 10-minute fire resistance.
Why: Standard shelves won't contain fires; rated cabinets do, buying time for evacuation. Unbox and inspect for damage. Success: Cabinet assembled, doors functioning smoothly, ready for mounting.
Note: For intermediate users, this involves basic assembly—follow manufacturer instructions closely.
💡 Tips:
- •Choose galvanized steel for corrosion resistance.
- •Add secondary containment trays for leaks.
⚠️ Warnings:
- •Do not modify the cabinet, as it voids safety certifications.
Step 4: Install the Cabinet Securely
Mark mounting holes using a level for a plumb installation, then drill into studs or use heavy-duty anchors. Secure the cabinet at least 18 inches off the ground to avoid floor spills. Test stability by applying pressure to doors.
Secure mounting prevents tip-overs during earthquakes or impacts. This 20-minute task ensures compliance with building codes. Success: Cabinet firmly attached, level, and immovable—shake it to confirm.
Safety First: Wear eye protection during drilling.
💡 Tips:
- •Use a stud finder for optimal anchoring.
- •Mount on wall if floor space is limited.
⚠️ Warnings:
- •Over-tightening screws can warp the frame—hand-tighten last.
Step 5: Organize and Segregate Materials
Place compatible items together: Flammables separate from oxidizers, liquids on lower shelves to contain spills. Limit to cabinet capacity (e.g., 25 gallons max for small units) and ensure lids are tight. Use secondary containers for partial cans.
Segregation avoids chemical reactions that could cause explosions. Fill slowly to prevent vapors. Success: Neatly arranged items, no overcrowding, with 20% empty space for airflow.
Best Practice: Heavier items on bottom for stability.
💡 Tips:
- •Group by flash point: Low (under 100°F) in most secure spots.
- •Use bungee cords to secure cylinders upright.
⚠️ Warnings:
- •Never mix acids with flammables—store separately.
Step 6: Label and Document Everything
Apply NFPA 704 hazard labels to each container and the cabinet exterior, noting contents and date stored. Create an inventory sheet posted nearby, including emergency contacts.
Clear labeling aids firefighters and prevents mix-ups. Use weatherproof stickers for garage conditions. Success: All items identifiable at a glance, documentation complete for inspections.
Quick Win: Digital photos of setup for insurance records.
💡 Tips:
- •Include 'No Smoking' signs on the cabinet.
- •Update labels annually or after use.
⚠️ Warnings:
- •Fading labels can lead to mishandling—check quarterly.
Step 7: Install Safety Accessories
Mount a Class B fire extinguisher within 10 feet, add spill kits, and install smoke/CO detectors if absent. Ground electrical outlets nearby and ensure good lighting.
These create a layered defense against incidents. Test extinguisher monthly. Success: Full safety setup, ready for daily use—your garage now meets basic code.
Essential: ABC multi-purpose extinguishers cover most garage fires.
💡 Tips:
- •Position extinguisher at eye level for quick grab.
- •Add a first-aid kit for chemical exposure.
⚠️ Warnings:
- •Expired extinguishers are useless—replace every 5-12 years.
Step 8: Perform Initial Inspection and Maintenance Plan
Inspect for leaks, secure fittings, and test door closures. Schedule monthly checks and annual professional reviews. Document everything in a log.
Ongoing maintenance catches issues early, ensuring long-term safety. Spend 10 minutes now. Success: A routine in place, reducing risks by 50% over time per fire safety studies.
💡 Tips:
- •Set phone reminders for inspections.
- •Train family on emergency procedures.
⚠️ Warnings:
- •Ignoring maintenance can void warranties and increase liability.
▸Pro Tips
- •Ventilate the garage before handling to disperse fumes—open doors for 30 minutes.
- •Use non-sparking brass tools for any adjustments inside the cabinet.
- •Invest in modular cabinets for future expansion as your storage needs grow.
- •Color-code storage: Red for flammables, yellow for oxidizers to prevent errors.
- •Keep a 3-foot clearance around the cabinet for easy access during emergencies.
- •For hot garages, add a temperature monitor to alert if over 80°F.
- •Dispose of waste properly via local hazardous waste programs to avoid buildup.
▸Common Mistakes to Avoid
- •Overloading the cabinet beyond capacity, leading to spills—always check gallon limits and leave space.
- •Storing incompatible chemicals together, risking reactions—segregate as per SDS sheets.
- •Placing near heat sources, accelerating vaporization—maintain 3-foot buffer zones.
- •Forgetting labels, causing confusion in emergencies—use durable, visible markers.
- •Skipping grounding for fuels, inviting static sparks—install clips on metal containers.
▸Troubleshooting
Problem: Cabinet doors won't close properly after installation
Solution: Check for level mounting and remove any obstructing items; adjust hinges with a screwdriver. If warped, contact manufacturer for replacement parts.
Problem: Fumes detected after storing
Solution: Verify all lids are tight and ventilation is open; relocate if persistent and test with a gas detector. Seek professional ventilation advice if needed.
Problem: Cabinet feels unstable on uneven floor
Solution: Use adjustable leveling feet or shims under base; re-anchor to wall studs. Consult a contractor if floor issues persist.
Problem: Local codes require permits
Solution: Contact your fire department for inspection guidelines before setup; when in doubt, hire a certified installer for compliance.
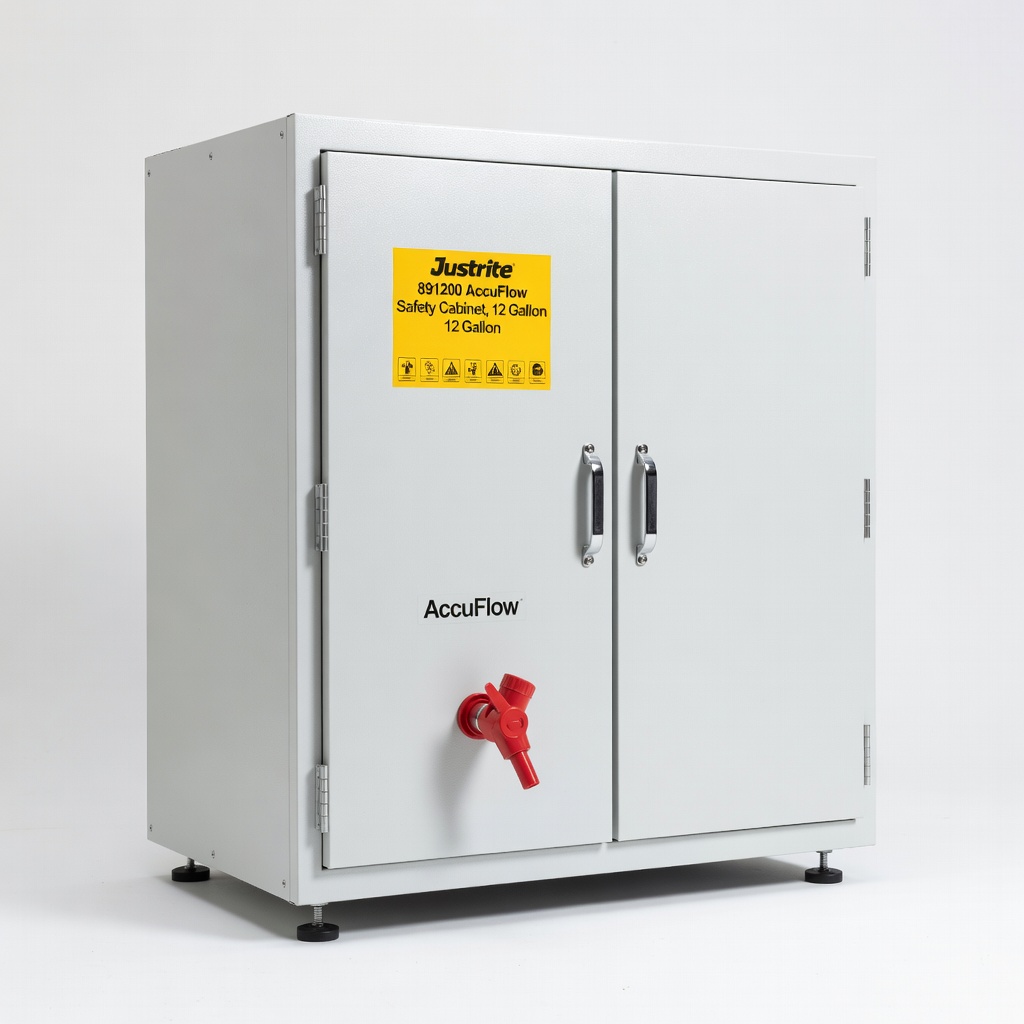
Justrite 891200 AccuFlow Safety Cabinet, 12 Gallon
FM-approved with self-closing doors and 10-minute fire rating, ideal for small garages to safely contain flammable liquids per OSHA standards.
Best for: Best for storing paints and solvents up to 12 gallons; use in intermediate setups needing compact, durable steel construction.
Price Range: $250-$300
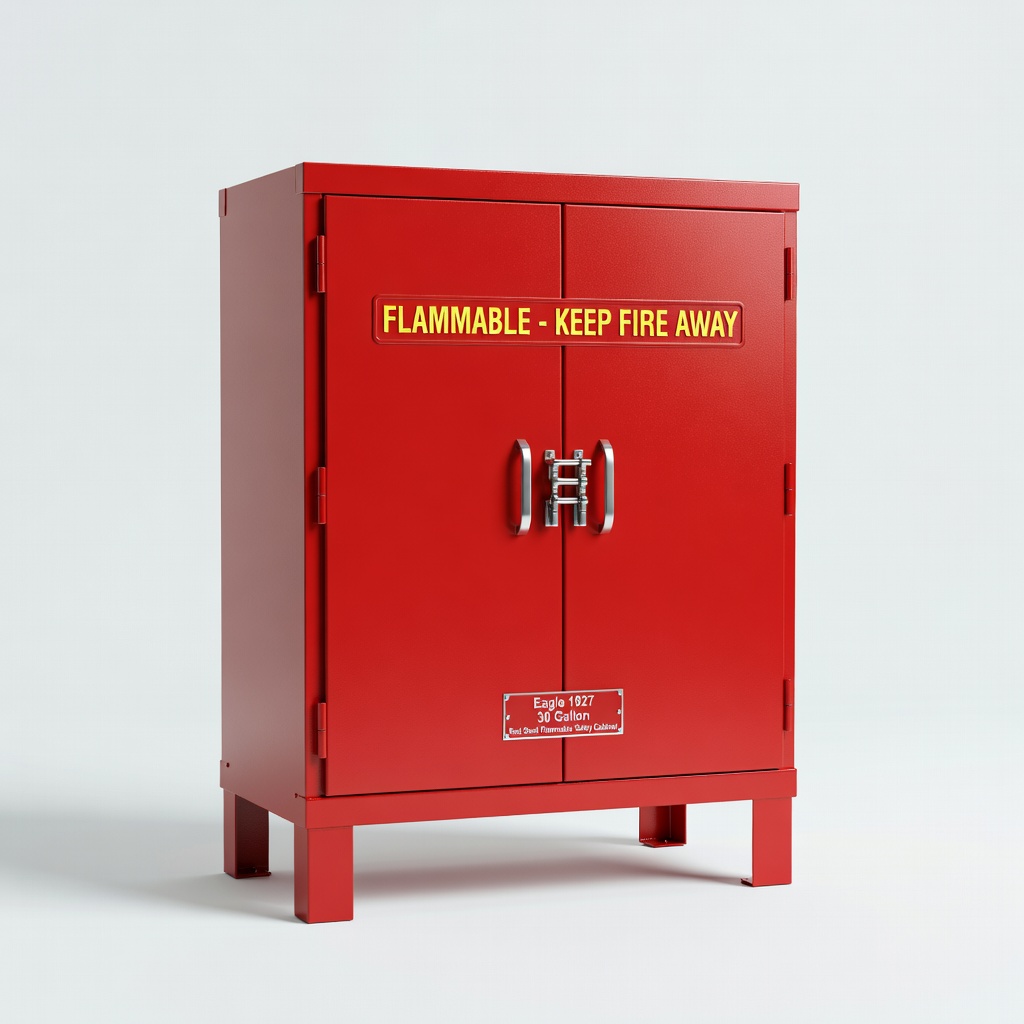
Eagle 1927 Red Steel Flammable Safety Cabinet, 30 Gallon
Robust double-wall design with spill containment and grounding wire, preventing leaks and static—highly rated for garage reliability.
Best for: Suitable for larger collections like fuels and thinners; mount on walls for space-saving in busy garages.
Price Range: $400-$500
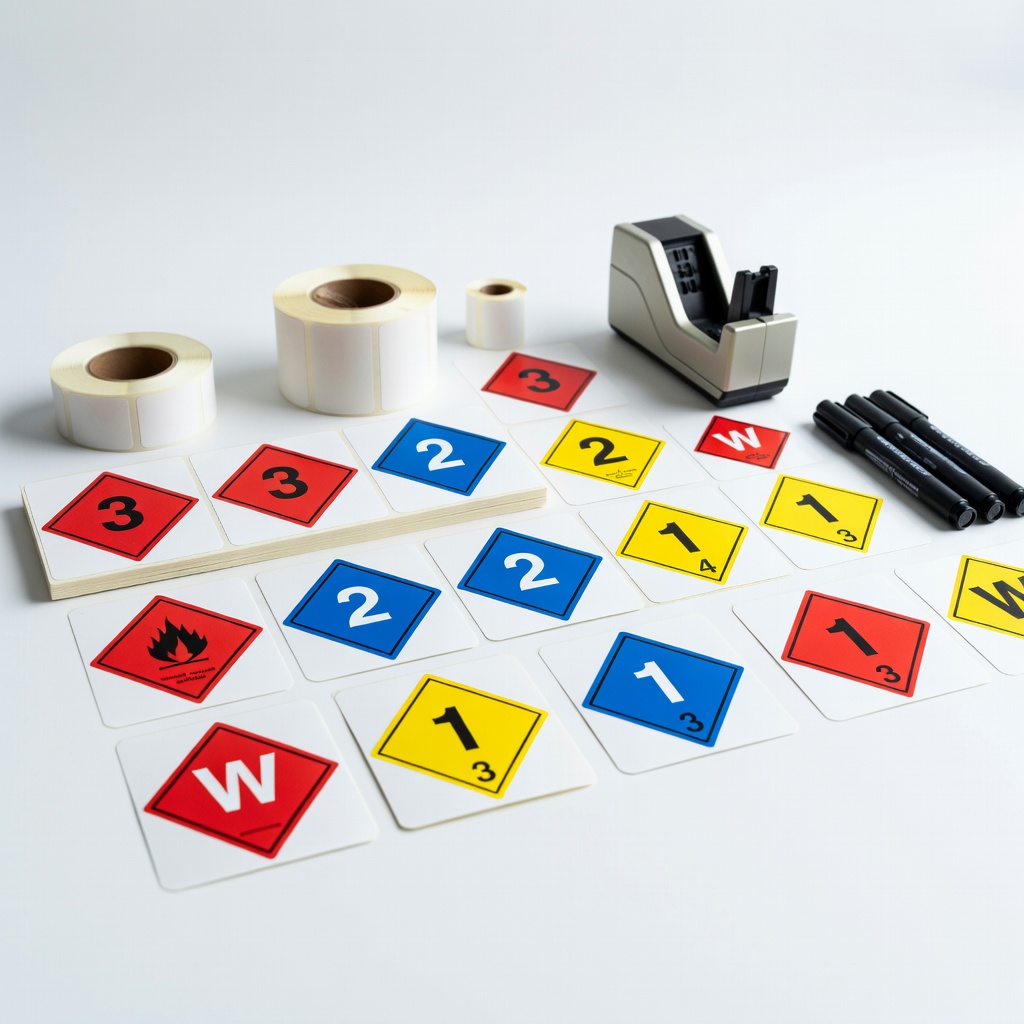
Brady NFPA 704 Hazard Labels Kit
Durable, color-coded diamond labels for quick hazard identification, essential for compliance and emergency response.
Best for: Apply to containers and cabinets during labeling step; perfect for DIYers ensuring family and firefighter safety.
Price Range: $20-$30
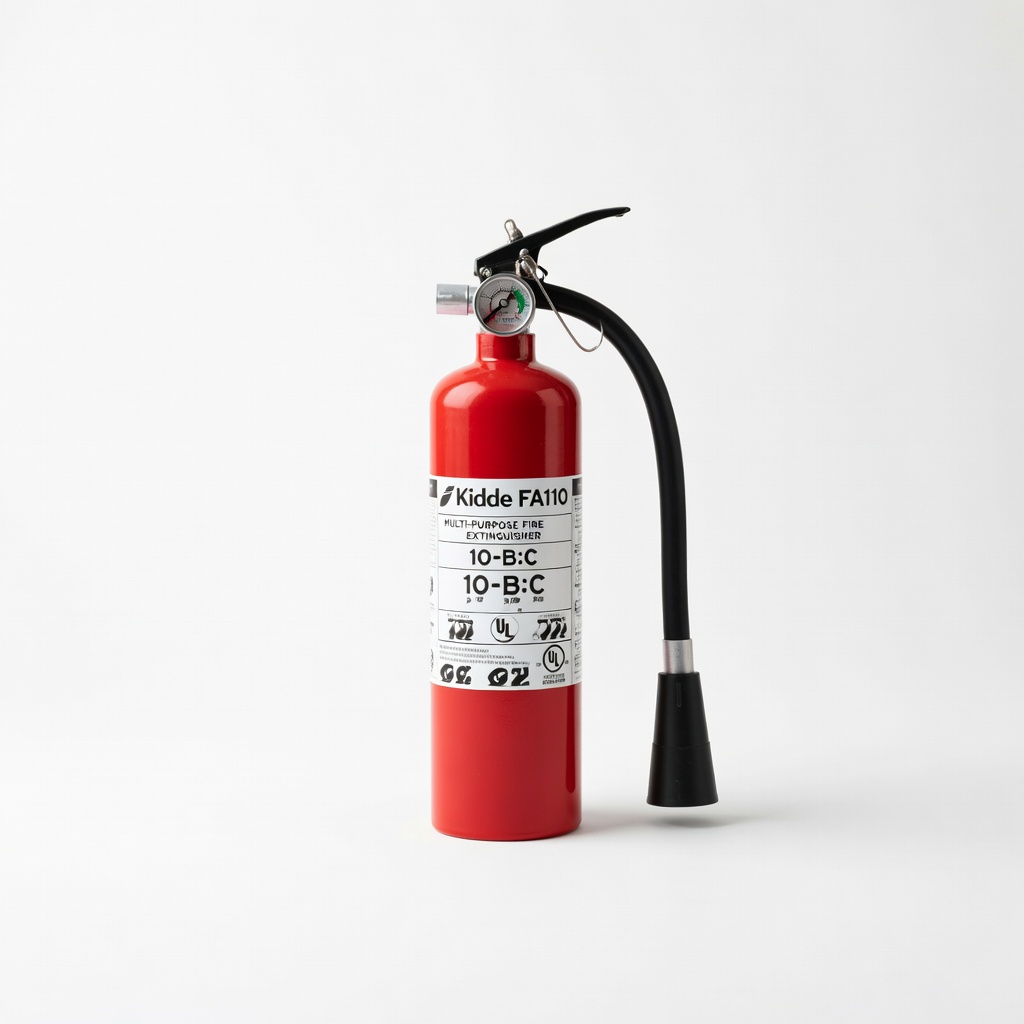
Kidde FA110 Multi-Purpose Fire Extinguisher, 10-B:C
Compact, easy-mount ABC extinguisher effective on flammable liquid fires, with 5-year warranty for reliable garage protection.
Best for: Place near storage for immediate access; ideal for intermediate users handling occasional spills.
Price Range: $25-$35
New Pig Absorbent Mat Kit for Chemical Spills
Non-reactive pads that contain and absorb flammable spills quickly, reducing cleanup time and fire spread risks.
Best for: Line cabinet shelves or keep handy for maintenance; great for garages with paint or solvent storage.
Price Range: $50-$70