Tomatoes are a favorite for home gardeners, but starting them in raised beds can make all the difference—better soil control, easier access, and fewer weeds. If you've struggled with patchy yields in traditional ground planting or want to avoid back strain from bending over, raised beds offer a game-changer for beginners. This guide will walk you through the process, helping you avoid common pitfalls and set up for a successful harvest.
In this step-by-step tutorial, you'll learn how to prepare your raised bed, select the right tomato varieties, plant them properly, and care for them initially. By the end, you'll have thriving tomato plants ready to produce fruit in just a few months. The whole process is straightforward, requiring no advanced skills, and can be completed in an afternoon.
Expect to spend 1-2 hours on the initial planting, with ongoing care taking about 15 minutes a day. It's beginner-friendly, assuming you have a basic raised bed setup, but we'll cover options if you're starting from scratch.
▸What You'll Need
- •Raised garden bed (at least 4x4 feet, 12-18 inches deep; required if starting new)
- •Tomato seedlings or transplants (determinate or indeterminate varieties suited to your climate; 4-6 plants for a standard bed)
- •Potting soil mix for raised beds (organic, well-draining; 8-10 cubic feet)
- •Compost or aged manure (for nutrient boost; 2-3 cubic feet)
- •Garden trowel or hand shovel (for digging holes)
- •Watering can or hose with gentle nozzle
- •Mulch (straw or wood chips; optional but recommended for moisture retention)
- •Tomato cages or stakes (for support; optional for initial planting but essential later)
- •Gloves and fertilizer (balanced, slow-release; optional)
Estimated Time: 1-2 hours for planting, plus 5-10 minutes daily for initial care
Difficulty: beginner
▸Step-by-Step Instructions
Step 1: Choose and Prepare Your Raised Garden Bed Location
Select a sunny spot in your yard that gets at least 6-8 hours of direct sunlight daily, as tomatoes thrive in full sun. Ensure the area is level and away from trees that might shade or drop debris. If you don't have a raised bed yet, assemble one now—most kits snap together easily.
Why it matters: Proper location prevents leggy plants from insufficient light and reduces disease risk from poor air circulation. Once positioned, line the bottom with cardboard or landscape fabric to suppress weeds (optional for wood beds). Fill the bed with a 50/50 mix of potting soil and compost, leaving 2-3 inches from the top for settling.
Expect the soil to feel loose and crumbly, not compacted. Water the empty bed lightly to moisten it before planting.
💡 Tips:
- •Test soil pH if possible (aim for 6.0-6.8); kits are available at garden stores.
⚠️ Warnings:
- •Avoid low-lying areas prone to flooding, as waterlogged roots can rot tomatoes.
Step 2: Select the Right Tomato Varieties
For beginners, choose disease-resistant hybrids like 'Celebrity' or 'Better Boy' for indeterminates (vining types) or 'Patio' for determinate (bushy) if space is limited. Buy healthy seedlings from a nursery—look for sturdy stems and vibrant green leaves, about 6-8 inches tall.
Why it matters: The right variety matches your climate and bed size, ensuring better yields. Indeterminate tomatoes need more support but produce longer; determinates are compact for small beds. Plan spacing: 18-24 inches apart in rows or a grid.
Success looks like selecting 4-6 plants that fit your bed without crowding, setting you up for pollination and fruit set.
💡 Tips:
- •Start with cherry tomatoes like 'Sweet 100' for faster, easier harvests.
⚠️ Warnings:
- •Don't buy yellowed or wilted plants; they're stressed and may fail to thrive.
Step 3: Prepare the Soil Mix
In your raised bed, mix the potting soil and compost thoroughly using a garden fork or trowel. Break up any clumps to ensure even drainage and aeration. If your soil tests acidic, add a bit of lime; for alkaline, use sulfur sparingly.
Why it matters: Tomatoes are heavy feeders needing nutrient-rich, well-draining soil to prevent root rot and promote strong growth. Raised beds warm up faster in spring, giving plants a head start.
Expect the mix to be dark, fluffy, and slightly moist—like a wrung-out sponge. This prep takes 10-15 minutes and is key to avoiding nutrient deficiencies later.
💡 Tips:
- •Incorporate worm castings for natural microbes that boost plant health.
⚠️ Warnings:
- •Skip fresh manure—it can burn roots; use only aged or composted.
Step 4: Dig Planting Holes
Use a trowel to dig holes twice as wide as the seedling's root ball but only as deep as the root system. For leggy seedlings, plant deeper—bury up to the first set of leaves to encourage stronger roots.
Why it matters: Deep planting stabilizes plants against wind and supports vertical growth. Space holes 18-24 inches apart, considering mature plant size.
You'll see the soil displaced in neat piles; the bed should now have a grid of holes ready for transplants. This step ensures roots spread easily without compaction.
💡 Tips:
- •Plant on a cloudy day or in the evening to reduce transplant shock.
⚠️ Warnings:
- •Don't plant too shallow; exposed roots dry out quickly.
Step 5: Plant the Tomato Seedlings
Gently remove seedlings from pots, tease apart roots if pot-bound, and place them in the holes. Backfill with soil, pressing lightly around the base to eliminate air pockets. Water immediately with a slow trickle to settle the soil.
Why it matters: Proper planting minimizes stress, allowing quick establishment. Raised beds provide warmth, so spring planting after frost is ideal (soil temp above 60°F).
Success: Plants stand upright, soil is firm but not packed, and water soaks in without pooling. Your bed now looks like a mini farm row.
💡 Tips:
- •Add a pinch of balanced fertilizer at planting for a nutrient kickstart.
⚠️ Warnings:
- •Handle roots delicately; damaged ones slow growth.
Step 6: Install Supports and Mulch
Place tomato cages or stakes next to each plant, securing them firmly into the soil. Spread 2-3 inches of mulch around the base, keeping it away from stems to prevent rot.
Why it matters: Supports prevent sprawling and breakage as fruits develop; mulch conserves water and suppresses weeds.
Expect plants to look supported and the bed tidy. This finishing touch protects your investment through early growth stages.
💡 Tips:
- •Use twine to tie stems loosely to stakes as they grow.
⚠️ Warnings:
- •Install supports early—mature plants are harder to stake without damage.
Step 7: Water and Initial Care
Water deeply once a week, aiming for 1-2 inches, checking soil moisture 2 inches down. Monitor for the first week, providing shade cloth if scorching sun hits.
Why it matters: Consistent moisture prevents blossom end rot and supports root development in the raised bed's contained environment.
Success: Soil stays evenly moist, leaves perk up, and no wilting occurs. You're now in maintenance mode for harvest in 60-80 days.
💡 Tips:
- •Early morning watering reduces evaporation and fungal risks.
⚠️ Warnings:
- •Overwatering leads to yellow leaves; let topsoil dry slightly between sessions.
▸Pro Tips
- •Rotate planting spots yearly to prevent soil-borne diseases like verticillium wilt.
- •Use companion planting—add basil or marigolds nearby to deter pests naturally.
- •For faster growth, pinch off suckers (side shoots) weekly after the plant reaches 12 inches.
- •Track your planting date and weather to predict harvest time accurately.
- •Invest in a soil moisture meter for precise watering without guesswork.
- •Prune lower leaves touching soil to improve airflow and reduce disease.
- •Fertilize every 4-6 weeks with tomato-specific formula for bigger fruits.
▸Common Mistakes to Avoid
- •Planting too early before last frost, leading to cold-damaged plants—wait until soil warms to avoid stunted growth; check local frost dates.
- •Crowding plants too closely, causing poor air circulation and fungal issues like blight—space properly to allow sunlight and breeze.
- •Inconsistent watering, resulting in cracked fruits or blossom end rot—maintain steady moisture with mulch and scheduled checks.
- •Skipping supports, allowing vines to sprawl and fruits to rot on ground—install early to save time and prevent losses.
- •Using poor soil without compost, leading to nutrient deficiencies—always enrich for healthy, productive plants.
▸Troubleshooting
Problem: Yellowing leaves after planting
Solution: This could be transplant shock or overwatering; reduce water and provide partial shade for a week. If persists, check for nutrient lack and add balanced fertilizer.
Problem: Plants wilting despite watering
Solution: Likely underwatering or poor drainage; ensure holes in bed bottom if needed, and water deeply but infrequently. Test soil pH and amend if off.
Problem: Pests like aphids appearing
Solution: Blast with water hose or use insecticidal soap spray. Introduce ladybugs as natural predators. Inspect daily to catch early.
Problem: No fruit setting
Solution: Could be extreme heat or lack of pollination; hand-pollinate with a brush if bees are scarce, and ensure consistent fertilizer. Seek extension service if issues continue.
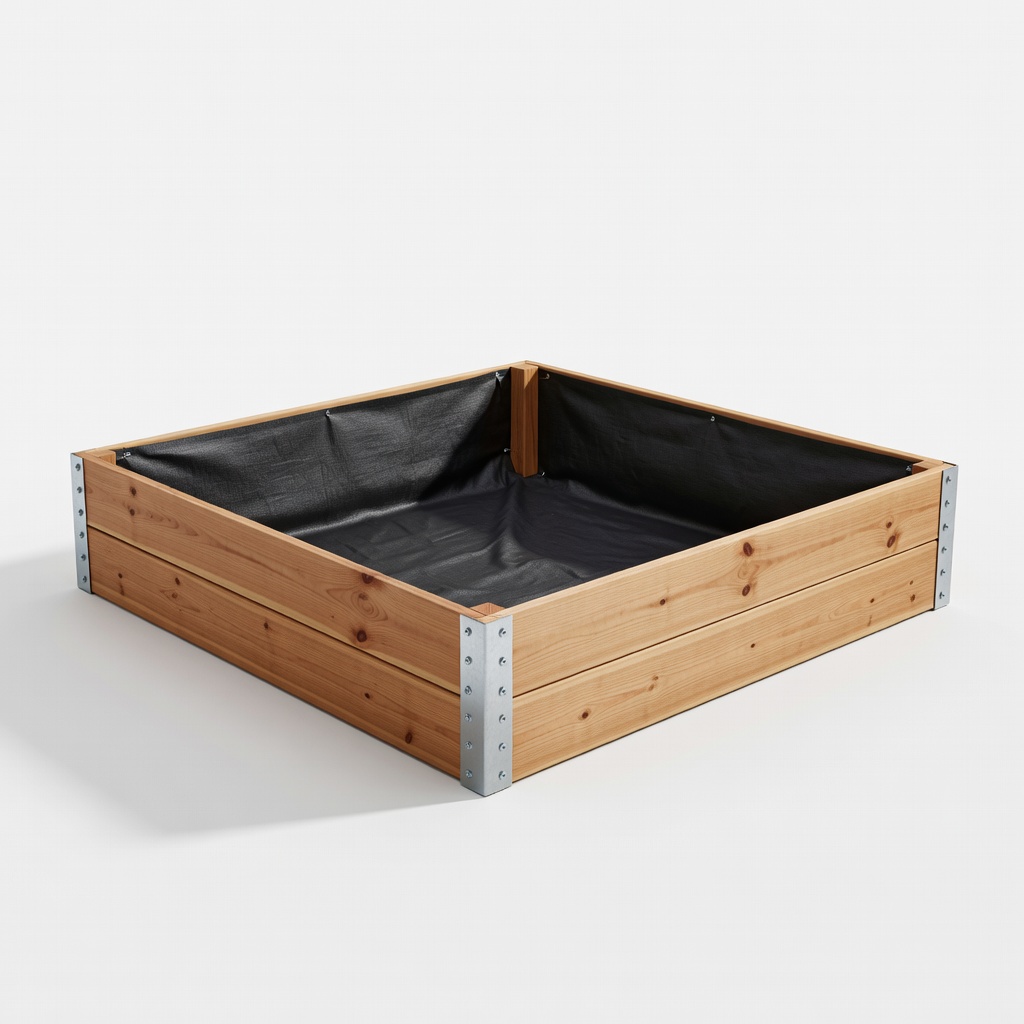
Best Choice Products 48x48x12-inch Raised Garden Bed Kit
This sturdy cedar wood kit is easy to assemble and perfect for beginners starting their first raised bed, providing ample space for 4-6 tomato plants.
Best for: Use for initial setup in small yards; durable against weather for multi-season use.
Price Range: $50-$70
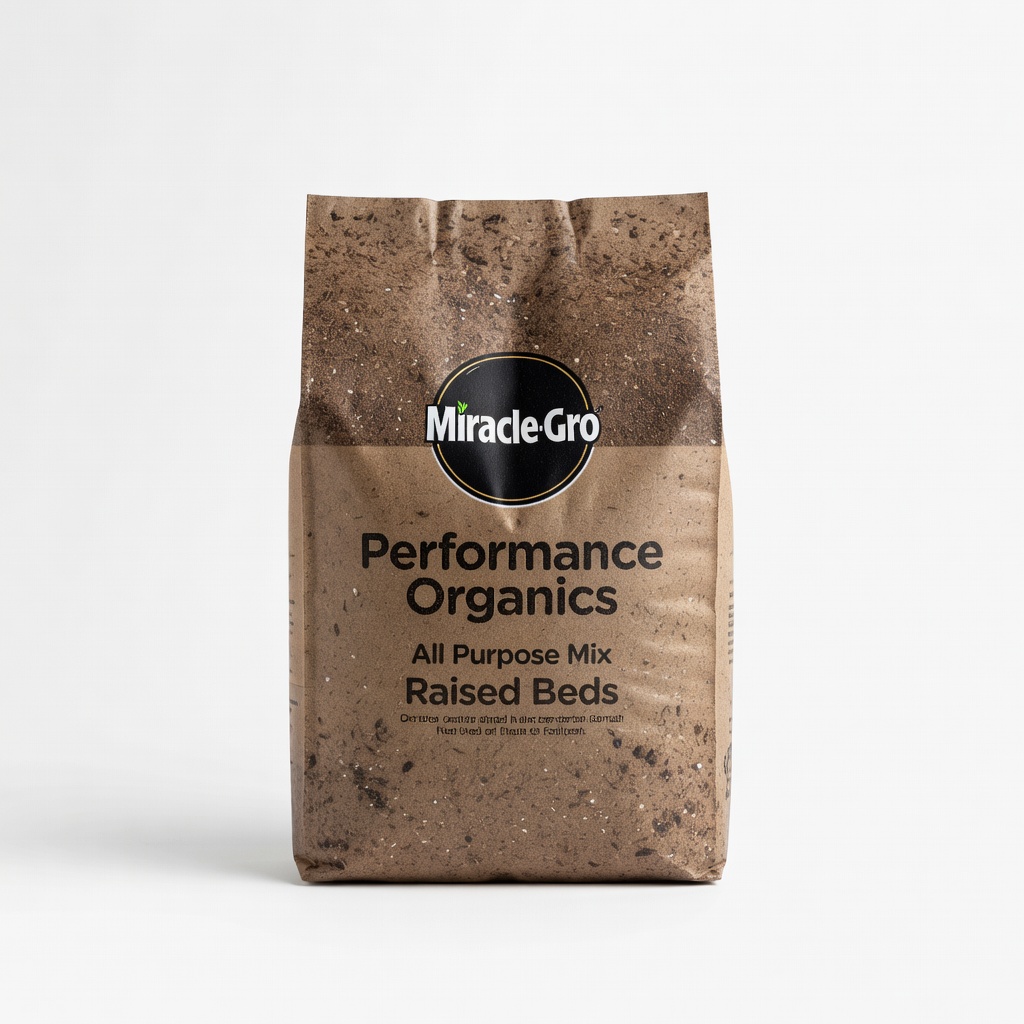
Miracle-Gro Performance Organics All Purpose Mix (for raised beds)
This premium soil blend is nutrient-rich and well-draining, ideal for tomatoes needing consistent fertility without compaction in raised beds.
Best for: Mix with compost for filling beds; great for organic gardening enthusiasts.
Price Range: $15-$25 for 1.3 cu ft bag
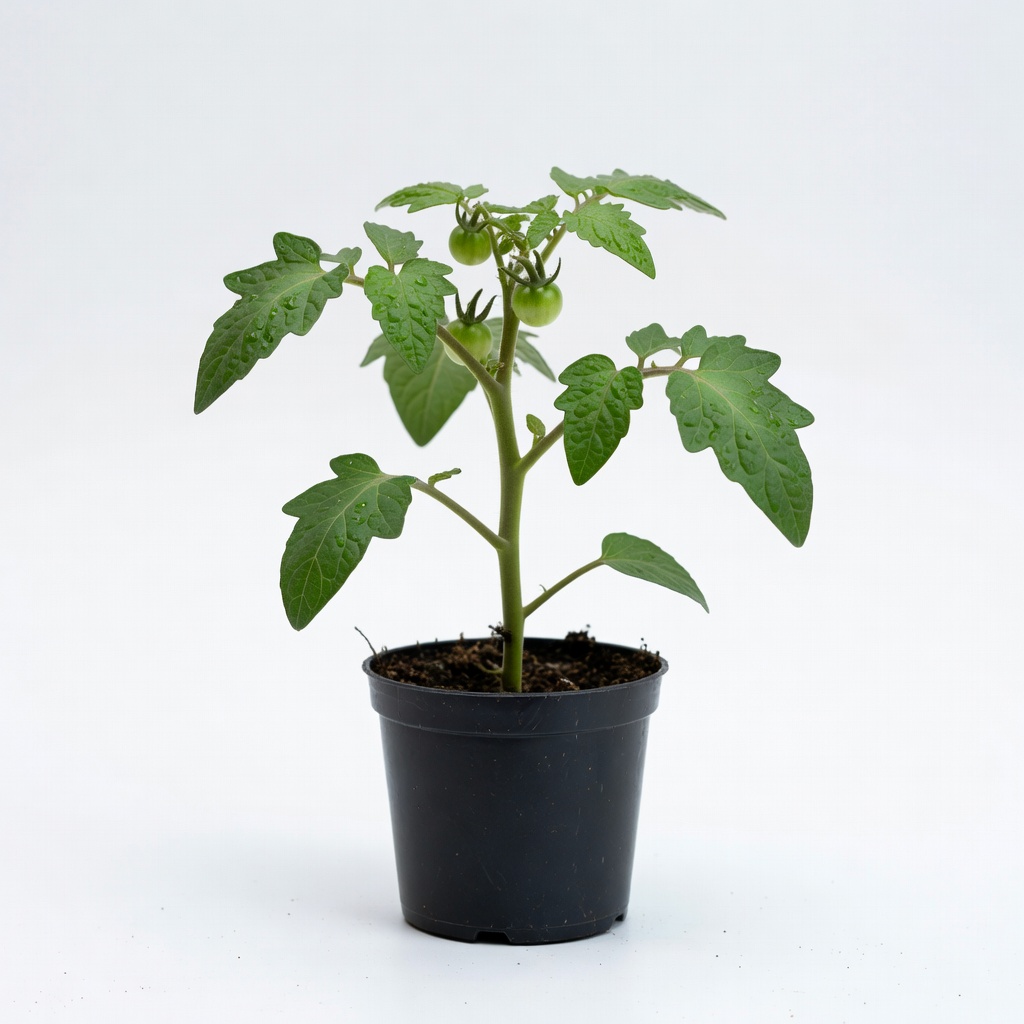
Bonnie Plants 'Celebrity' Tomato Starter Plant (pack of 1)
Disease-resistant and high-yielding, this hybrid is beginner-proof, producing medium fruits reliably in raised beds.
Best for: Direct transplant for quick starts; buy multiples for bed filling.
Price Range: $4-$6 per plant
Gardman Tomato Trellis Netting
Affordable and expandable support that keeps indeterminate tomatoes off the ground, preventing rot and easing harvest.
Best for: Install over cages for extra vining support in larger beds.
Price Range: $10-$15
Dr. Earth Home Grown Tomato & Vegetable Food Fertilizer
Organic, slow-release formula tailored for tomatoes, promoting fruit without burning roots—essential for raised bed nutrient management.
Best for: Apply at planting and monthly for sustained growth.
Price Range: $10-$20 for 4 lb bag