A slow-draining kitchen sink can turn meal prep into a frustrating mess, with water pooling around dirty dishes and the constant worry of backups. If you've noticed your sink taking forever to empty, it's likely due to grease, food scraps, or soap buildup in the pipes. The good news? You don't need to be a plumbing pro to fix it—most clogs are simple and can be cleared at home.
In this guide, you'll learn safe, effective methods to unclog your sink, starting with the easiest options and progressing to more thorough solutions. We'll cover everything from using household items to basic tools, so you can choose what fits your comfort level. Expect to spend 15-30 minutes, depending on the clog's severity, and no prior experience is required—just follow along carefully.
By the end, your sink will drain like new, and you'll have tips to prevent future issues. If the problem persists, we'll guide you on when to call a professional.
▸What You'll Need
- •Rubber gloves (required for protection)
- •Bucket or large bowl (to catch water)
- •Plunger (required; a cup-style works best for sinks)
- •Baking soda and white vinegar (required for natural cleaning method)
- •Boiling water (from a kettle or pot)
- •Drain snake or drain auger (optional but recommended for deeper clogs; flexible plastic type for beginners)
- •Old rags or towels (for cleanup)
- •Flashlight (optional, to inspect the drain)
Estimated Time: 15-30 minutes
Difficulty: beginner
▸Step-by-Step Instructions
Step 1: Prepare Your Workspace
Before diving in, clear the area around your sink to avoid slips and make cleanup easier. Remove any dishes or items from the sink basin and place a bucket underneath the pipes if accessible. Put on rubber gloves to protect your hands from grime and potential chemicals.
This step matters because a cluttered space can lead to accidents, like spilling dirty water. You'll know it's successful when you have a clean, dry workspace ready for action—expect some initial mess from standing water, so have towels handy.
Tip: Lay down old newspapers or towels on the floor to catch drips.
💡 Tips:
- •Work during the day for better lighting to see inside the drain.
⚠️ Warnings:
- •Avoid using the sink for anything else until the fix is complete to prevent worsening the clog.
Step 2: Remove Standing Water
If there's pooled water in the sink, bail it out using a cup or the bucket. Pour it into another sink or container to empty the basin as much as possible.
Why this matters: Excess water can dilute cleaning agents or make plunging less effective. Success looks like an empty sink, ready for the next method— you might still see slow trickling, but the basin should be mostly clear.
This quick step prevents overflow and sets you up for better results.
💡 Tips:
- •If the water is very dirty, strain it through a cloth to avoid spreading debris.
⚠️ Warnings:
- •Don't pour the dirty water down another drain, as it could cause clogs elsewhere.
Step 3: Try the Plunger Method
Fill the sink with enough water to cover the plunger's cup (about 2-3 inches). Place the plunger over the drain opening, ensuring a tight seal. Push down firmly and pull up quickly in a pumping motion 10-15 times.
This creates pressure to dislodge minor clogs like food particles. It matters because it's the simplest, chemical-free way to start. Expect water to splash a bit—success is when water starts draining faster; test by running tap water.
If it works, flush with hot water to clear residue.
💡 Tips:
- •Use a sink-specific plunger for better suction; avoid toilet plungers as they're too large.
⚠️ Warnings:
- •Don't plunge too aggressively, as it could damage porcelain.
Step 4: Use Baking Soda and Vinegar
If plunging doesn't work, pour 1/2 cup of baking soda directly into the drain, followed by 1/2 cup of white vinegar. The mixture will fizz and bubble as it breaks down organic buildup like grease.
Let it sit for 15-20 minutes to loosen the clog— this natural reaction is safer than chemicals for beginners. Why it works: The fizzing action scrubs pipes without harsh fumes. Success: After pouring hot water to flush, the drain should flow steadily.
Cover the drain with a rag to contain the reaction if needed.
💡 Tips:
- •For tougher clogs, repeat the process once more before moving on.
⚠️ Warnings:
- •Never mix this with chemical cleaners, as it can create dangerous gases.
Step 5: Flush with Boiling Water
Boil a kettle or pot of water and slowly pour it down the drain in stages, waiting a minute between pours. This melts grease and rinses away loosened debris.
It's essential after chemical or natural methods to clear remnants. Expect steam and faster flow—full success means water drains completely without backup.
If your pipes are PVC, use hot (not boiling) water to avoid warping.
💡 Tips:
- •Add a teaspoon of dish soap to the boiling water for extra grease-cutting power.
⚠️ Warnings:
- •Test a small amount first if unsure about pipe material.
Step 6: Insert a Drain Snake if Needed
For persistent clogs, feed a drain snake into the drain, twisting as you push to break up deeper blockages. Pull it out slowly, wiping off debris.
This mechanical tool reaches where liquids can't, targeting hair or food far down the pipe. It matters for clogs beyond the trap. Success: Debris on the snake and improved drainage—run water to confirm.
Start with a short, flexible snake for sinks.
💡 Tips:
- •Go slow to avoid kinking the snake.
⚠️ Warnings:
- •Don't force it; if it meets resistance, stop and consider professional help.
Step 7: Clean Up and Test
Wipe down the sink and surrounding area with a rag. Run hot water for 1-2 minutes to ensure everything is clear.
Final testing confirms the fix—watch for steady flow without gurgling. This prevents immediate re-clogging.
If successful, your sink is back to normal; maintain it to avoid repeats.
💡 Tips:
- •Install a drain screen to catch future debris.
⚠️ Warnings:
- •Monitor for a few days; recurring issues may need pipe inspection.
▸Pro Tips
- •Prevent clogs by running hot water after every use and avoiding pouring grease down the drain.
- •For greasy sinks, start with the baking soda method as it targets fats best.
- •Use a flashlight to check for visible debris before starting.
- •If you have a garbage disposal, run it with hot water first to break down food.
- •Time your fix for when the sink is empty, like after dinner, to minimize disruption.
- •Wear old clothes; plumbing can get messy quickly.
- •After fixing, flush with a mix of salt and baking soda monthly for maintenance.
▸Common Mistakes to Avoid
- •Using chemical drain cleaners first: They can damage pipes and are harsh on septic systems—start with natural methods instead.
- •Over-plunging without a seal: This wastes effort; ensure the plunger cups the drain fully to build pressure.
- •Ignoring the P-trap: Forgetting to check under the sink can miss easy fixes—always inspect there if surface methods fail.
- •Pouring boiling water on plastic pipes: It can warp them; use hot tap water as a safer alternative.
- •Not testing thoroughly: Running water briefly might seem fixed, but slow drainage returns—flush for minutes to confirm.
▸Troubleshooting
Problem: Clog persists after all steps
Solution: The blockage may be deeper in the main line; try a wet/dry shop vac on the drain or call a plumber to avoid pipe damage.
Problem: Sink backs up into other drains
Solution: This indicates a main line issue; stop DIY and contact a professional immediately to prevent flooding.
Problem: Foul odors after fixing
Solution: Pour a mix of baking soda and lemon juice down the drain, then flush; if it lingers, clean the P-trap under the sink.
Problem: Water leaks during process
Solution: Tighten connections or use plumber's tape; if under sink, place a bucket and seek pro help for pipe repairs.
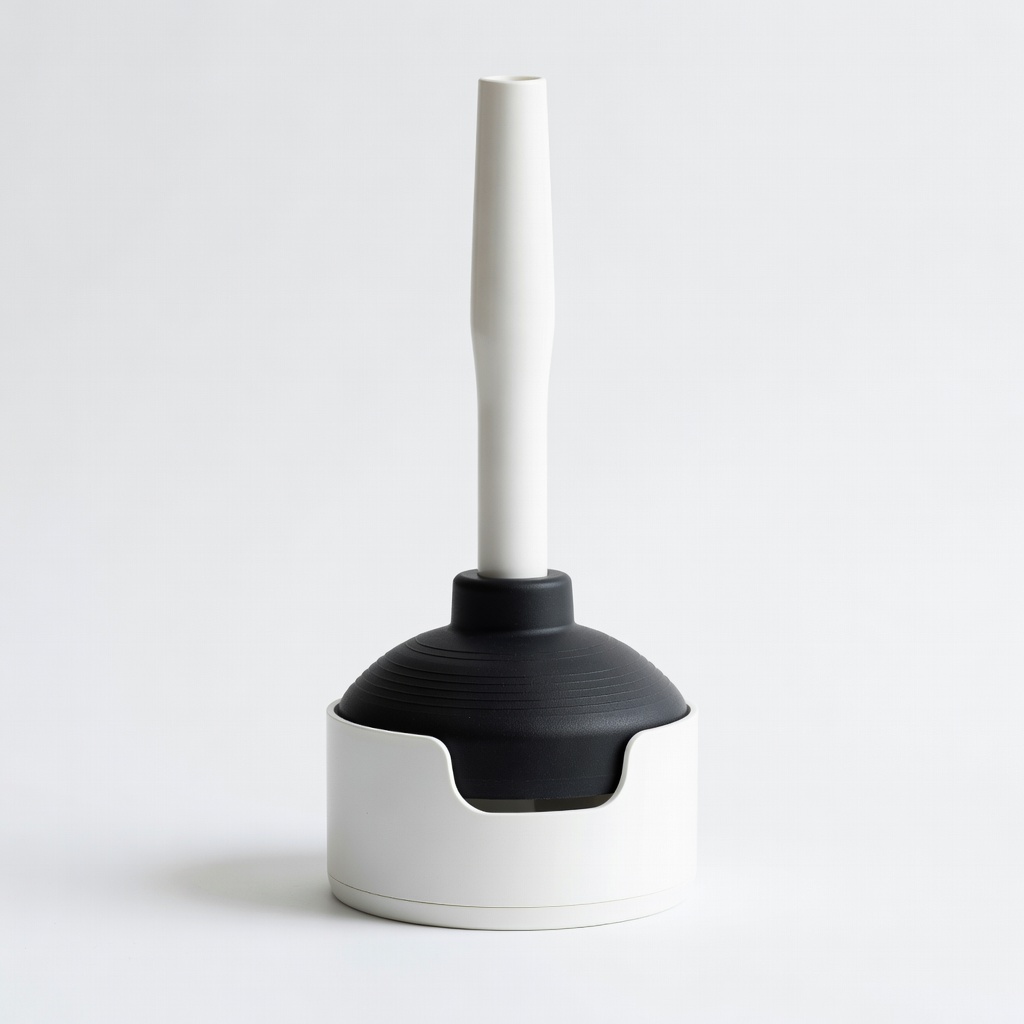
MR.SIGA Heavy Duty Toilet Plunger with Holder
This plunger has a high-efficiency beehive design that creates a strong seal for sinks, making it easier to dislodge clogs without chemicals.
Best for: Ideal for the initial plunging step on kitchen sinks; durable for repeated home use.
Price Range: $12.99
FlexiSnake Drain Weasel Sink Snake Hair Remover
Flexible and easy to use for beginners, it reaches deep into pipes to pull out hair, food, and gunk without disassembly.
Best for: Perfect for stubborn clogs after natural methods fail; reusable and compact for storage.
Price Range: $4.99
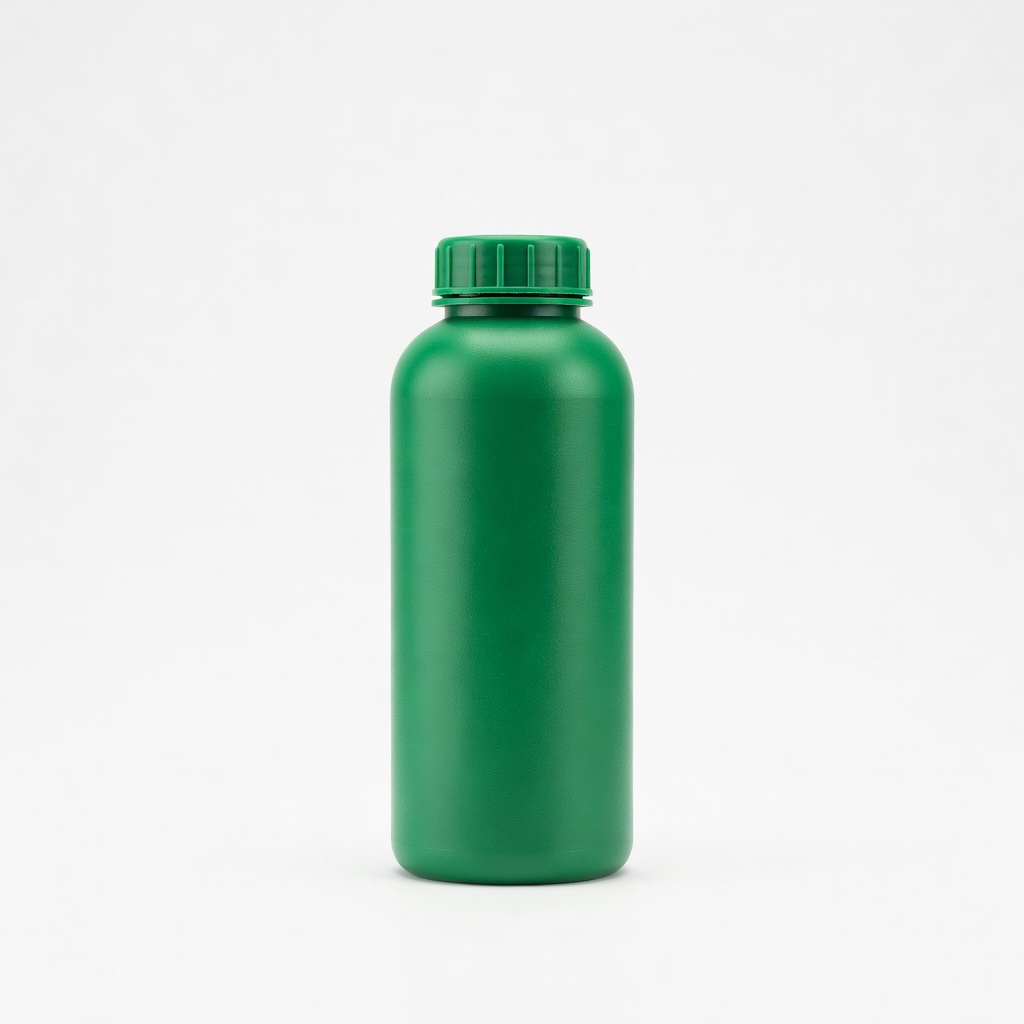
Green Gobbler Drain Clog Dissolver
An enzyme-based cleaner that's septic-safe and effective on organic buildup like grease, as a last-resort natural alternative to harsh chemicals.
Best for: Use after mechanical methods for residual clogs; pour and let sit overnight for tough jobs.
Price Range: $19.97
OXO Good Grips Pop-Up Sink Drain Stopper
Prevents future clogs by catching debris while allowing easy drainage; silicone material is durable and fits most sinks.
Best for: Install after fixing to maintain clear pipes; great for ongoing prevention.
Price Range: $12.99