Imbalanced 12V battery packs in solar systems are a silent killer—high cells overcharge while low ones sulfation, slashing capacity by 30-50% and risking fires. For advanced off-grid users, proper balancing restores full performance and safety.
This guide teaches you to top-balance 4S LiFePO4 packs (common for 12V solar) using active balancers. You'll learn precise voltage measurements, balancing protocols, and verification tests. Expect 2-3 hours for a single pack, assuming you have basic electronics experience.
No more guesswork: follow these steps for professional results, with pro tips on BMS integration and capacity testing.
▸What You'll Need
- •Digital multimeter with 0.001V resolution (e.g., for cell voltage accuracy)
- •4S active battery balancer (1-2A shunt-type for LiFePO4)
- •LiFePO4-compatible charger (14.4-14.6V constant voltage)
- •Thin jumper wires with alligator clips (16-20 AWG)
- •Insulated torque screwdriver (for cell terminals, 2-5 Nm)
- •Safety gear: insulated gloves, safety glasses, fire extinguisher (Class D for Li)
- •Optional: IR thermometer, cell holder/spacer
- •Notebook for logging voltages
Estimated Time: 2-3 hours per pack (plus 4-8 hours monitoring)
Difficulty: advanced
▸Step-by-Step Instructions
Step 1: Set Up Safe Workspace
Choose a cool, well-ventilated area away from flammables. Disconnect the battery from solar charge controller, inverter, and load—confirm zero voltage across terminals with multimeter.
Wear safety gear. If pack has BMS, bypass or disconnect it temporarily (note wiring). Why? Prevents shorts or unintended discharge during access.
Success: Workspace clear, battery isolated (reads 0V).
💡 Tips:
- •Work at <25°C to minimize cell stress.
⚠️ Warnings:
- •Never balance under load or connected to system—fire risk.
Step 2: Access Individual Cells
For pre-built packs, remove cover screws carefully. Identify 4 cells (B- to B1, B1-B2, B2-B3, B3-B+). Use torque wrench to loosen if needed.
Clean terminals with isopropyl alcohol. Label cells 1-4 from negative to positive.
Success: Cells exposed, terminals clean and accessible.
💡 Tips:
- •Photograph wiring before disassembly.
⚠️ Warnings:
- •Avoid bridging terminals—use plastic tools.
Step 3: Measure Cell Voltages
Set multimeter to DCV (mV mode). Probe each cell: black to negative, red to positive. Log voltages (ideal fully charged: 3.40-3.50V per cell; total 13.6-14.0V).
Calculate spread: max - min voltage. >0.05V imbalance needs correction.
Success: All voltages logged; identify highest cell (target for top-balance).
💡 Tips:
- •Average 3 readings per cell for accuracy.
Step 4: Connect Active Balancer
Match balancer leads to cells: B- to cell1-, B1 to cell1+/cell2-, etc., up to B+ (common positive). Active balancers shuttle charge from high to low cells.
Power on balancer (some self-power from cells). LEDs indicate balancing activity.
Success: Balancer LEDs flashing, no heat/smoke.
💡 Tips:
- •Use 1-2A model for faster balancing on 100-200Ah packs.
⚠️ Warnings:
- •Polarity critical—reverse fries balancer.
Step 5: Top-Balance to 3.50V
Let balancer run until all cells hit 3.45-3.50V (monitor every 30min). Expect 1-4 hours depending on imbalance.
Why top-balance? Equalizes at upper voltage knee for full capacity calibration.
Success: Voltage delta <0.01V across cells.
💡 Tips:
- •Stir air with fan if cells warm >40°C.
Step 6: Verify Balance and Disconnect
Re-measure all cells off-balancer. Delta <0.005V ideal. Disconnect balancer leads carefully.
Reconnect BMS if bypassed.
Success: Stable equal voltages, no drift in 10min.
⚠️ Warnings:
- •Don't leave balancer connected long-term.
Step 7: Reassemble and Initial Charge
Torque terminals (check specs, ~3Nm). Close pack. Connect charger at 14.6V CV mode, no current limit initially.
Charge to 14.4V cutoff, monitor total voltage.
Success: Pack holds 14.4V, cells balanced under load.
💡 Tips:
- •Log Ah input for capacity estimate.
Step 8: Test Capacity and Integrate
Discharge at C/10 rate (e.g., 10A for 100Ah), measure Ah to cutoff (10V pack). Compare to rated.
Reintegrate to solar: monitor BMS logs for balance maintenance.
Success: >95% rated capacity, no cell drift over days.
💡 Tips:
- •Use solar controller with equalize mode post-balance.
▸Pro Tips
- •Prefer active over passive balancers for 5x faster results on large packs.
- •Balance every 3-6 months or after deep discharge (>80% DOD).
- •Integrate with BMS that has 100mA+ balancing current.
- •Use gold-plated connectors for low resistance.
- •Top-balance before first full charge cycle.
- •Monitor internal resistance (IR) with advanced DMM—<0.5mΩ good.
- •For series packs, balance individually first.
▸Common Mistakes to Avoid
- •Balancing without isolating cells: Causes shorts and fires.
- •Using lead-acid methods on LiFePO4: Wrong voltages damage cells.
- •Ignoring BMS: Built-in balancers may conflict or underperform.
- •Rushing verification: Imbalance returns quickly without <0.01V delta.
- •Overheating cells: Balance in bursts if >45°C.
▸Troubleshooting
Problem: Balancer not activating
Solution: Check polarity and min voltage delta (>0.02V). Test leads continuity.
Problem: Cells drifting post-balance
Solution: Check cell IR imbalance or bad connection. Re-top balance and add BMS.
Problem: Excessive heat during balance
Solution: Pause, cool cells. Use higher A balancer or check shorted cell.
Problem: Pack won't hold charge
Solution: One cell failed—measure under load. Replace if <2.5V loaded.
Problem: BMS trips
Solution: Reset and balance with BMS bypassed. Upgrade to smart BMS.
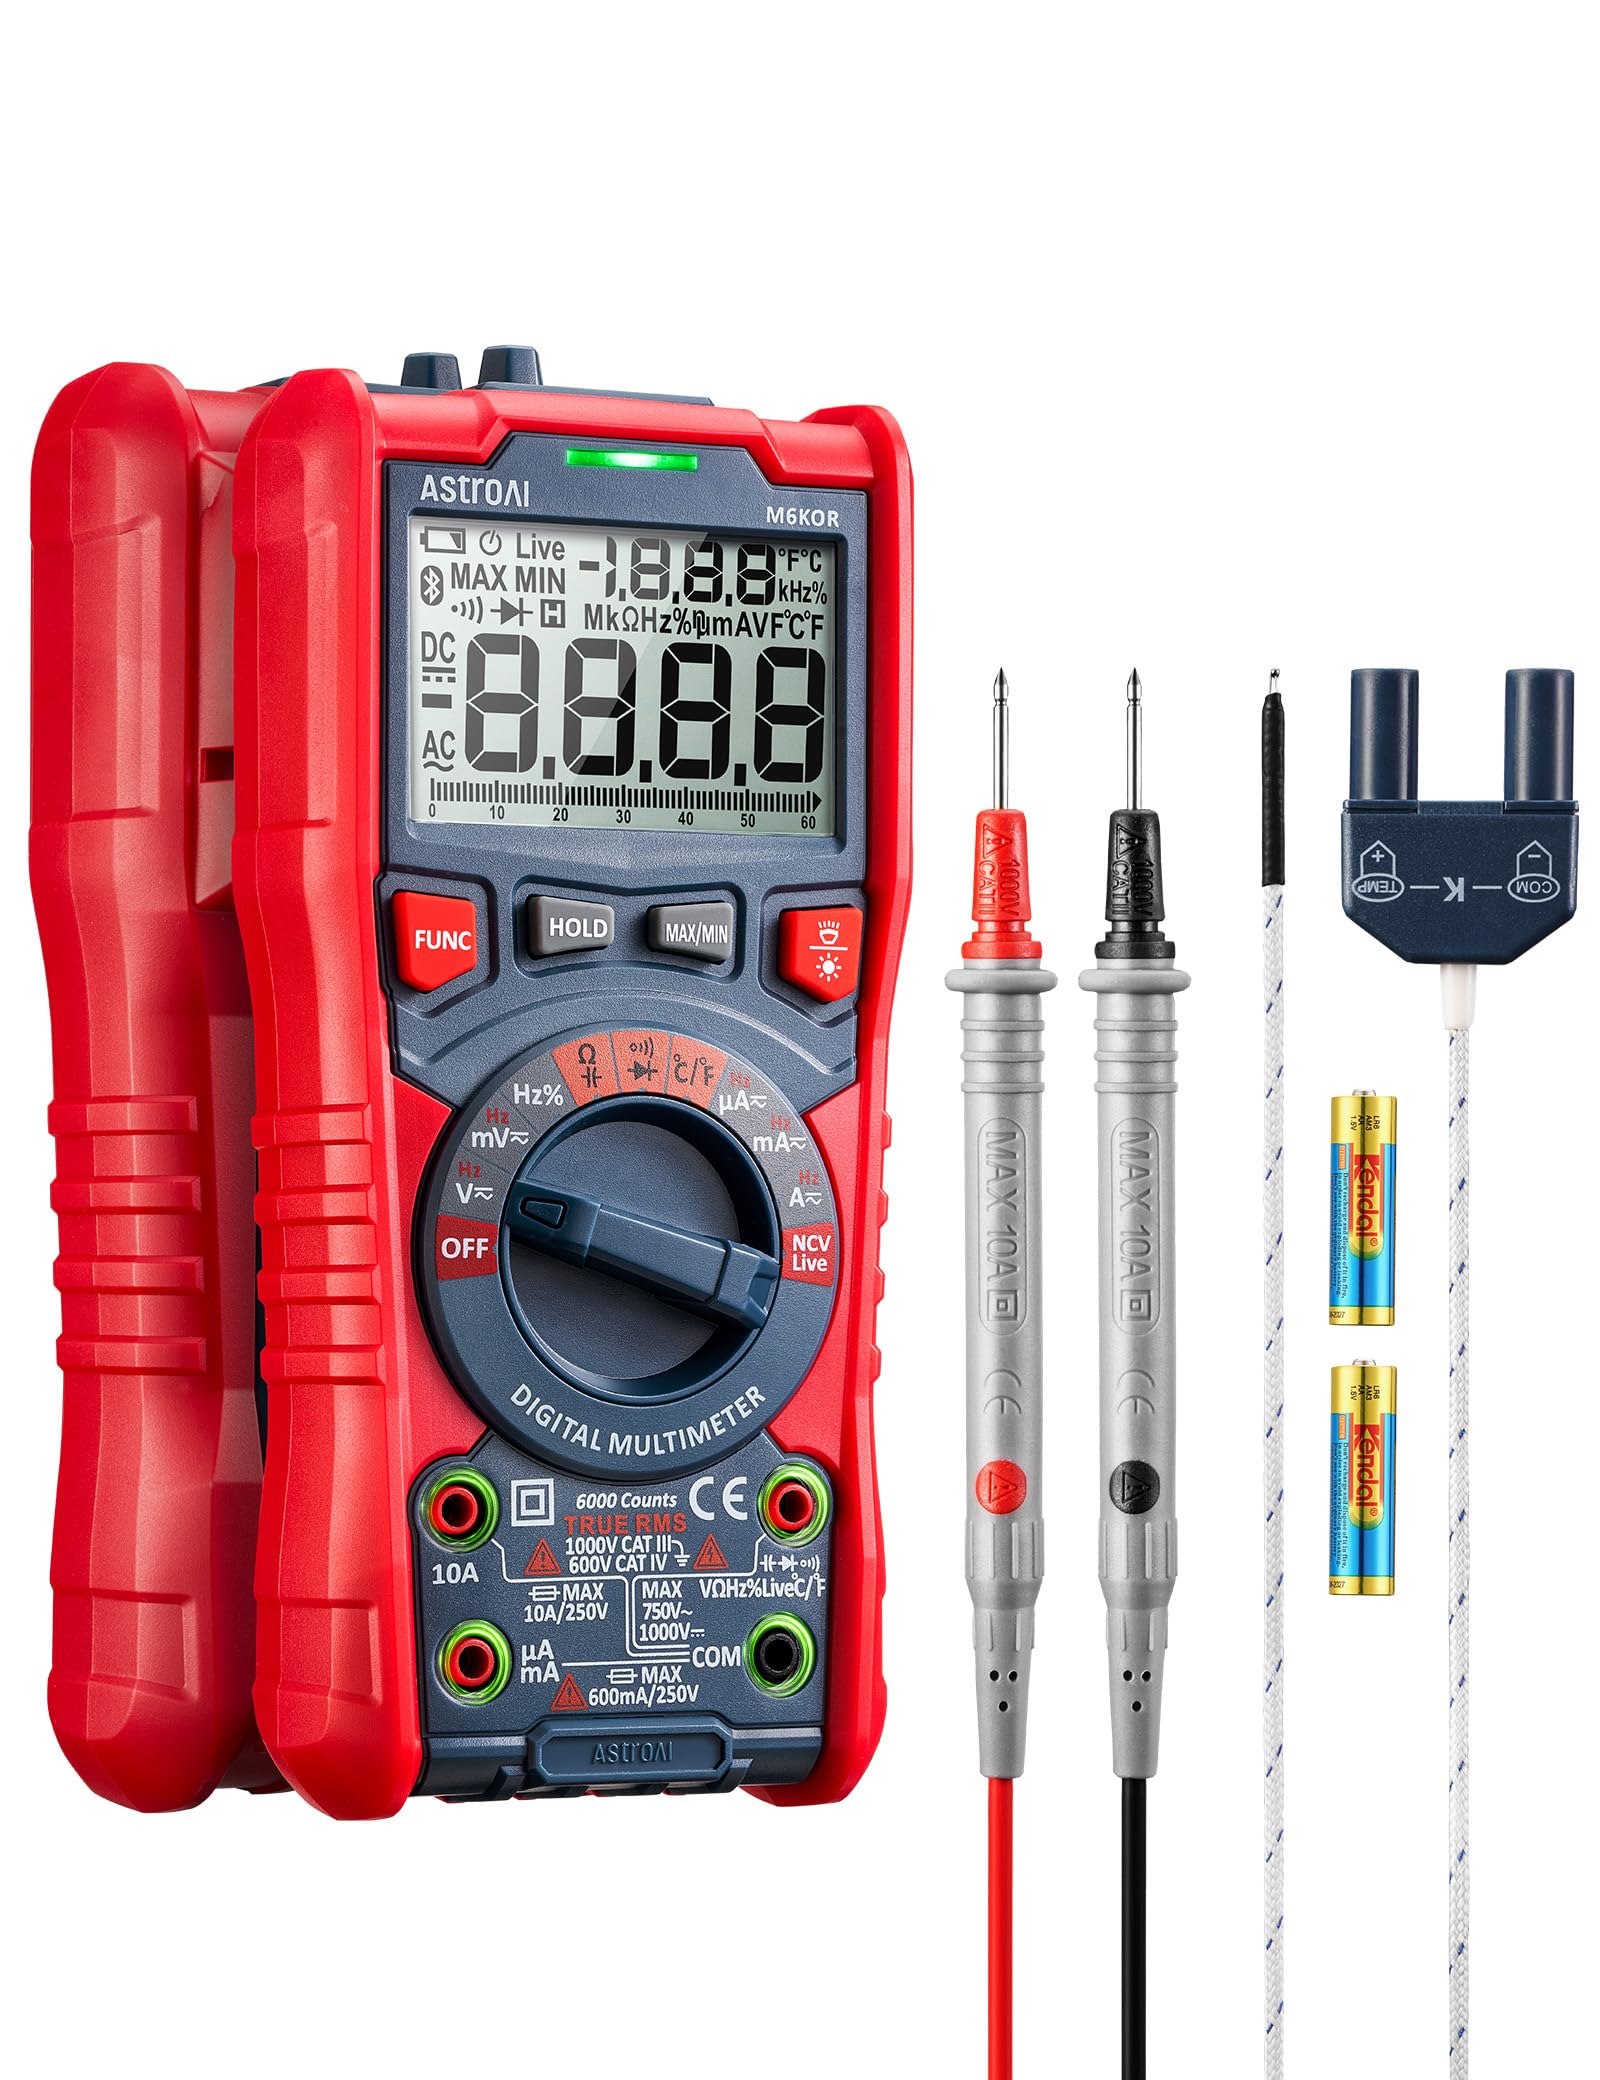
AstroAI Digital Multimeter 6000 Counts (ASIN: B08NMWSFJQ)
High precision (0.001V) essential for detecting tiny imbalances in LiFePO4 cells.
Best for: Voltage and continuity checks during measurements.
Price Range: $32.99
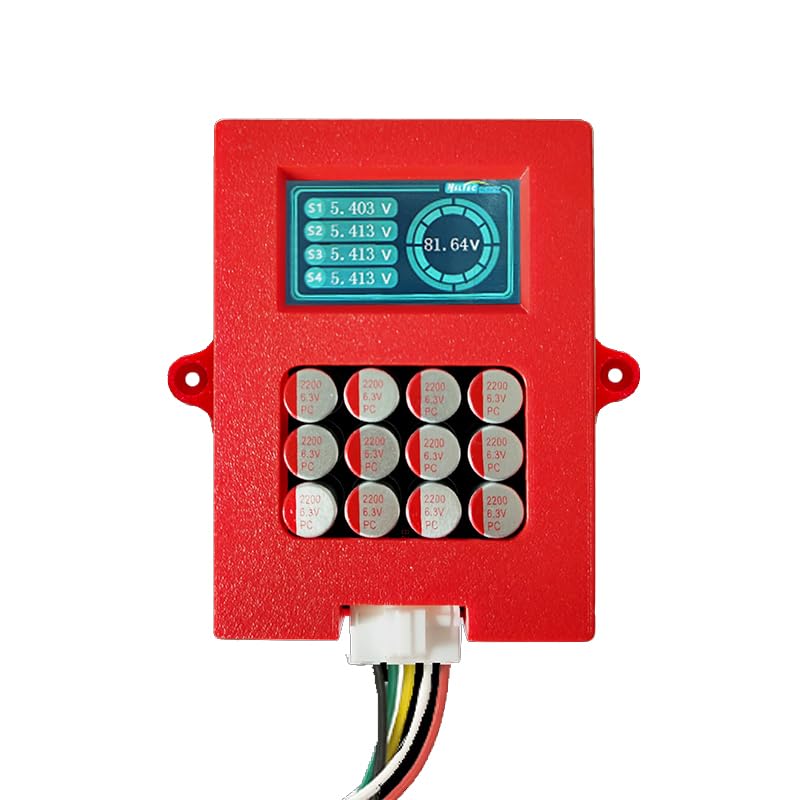
Heltec 4S 12V 2A Active Balancer (ASIN: B0B5JHP5R6)
Fast shunt balancing (2A) handles 100-280Ah solar packs efficiently without waste heat.
Best for: Core tool for equalizing cells during top-balance.
Price Range: $19.99
LiTime 14.6V 20A LiFePO4 Charger (ASIN: B09M8G5Z5Z)
Precise CV charging post-balance to set full capacity without overvoltage.
Best for: Initial capacity-forming charge after balancing.
Price Range: $69.99
Klein Tools MM700 Multimeter (ASIN: B07H64T8BF)
TRMS accuracy and durability for pro-level solar installs.
Best for: Advanced users needing IR and load testing.
Price Range: $59.97
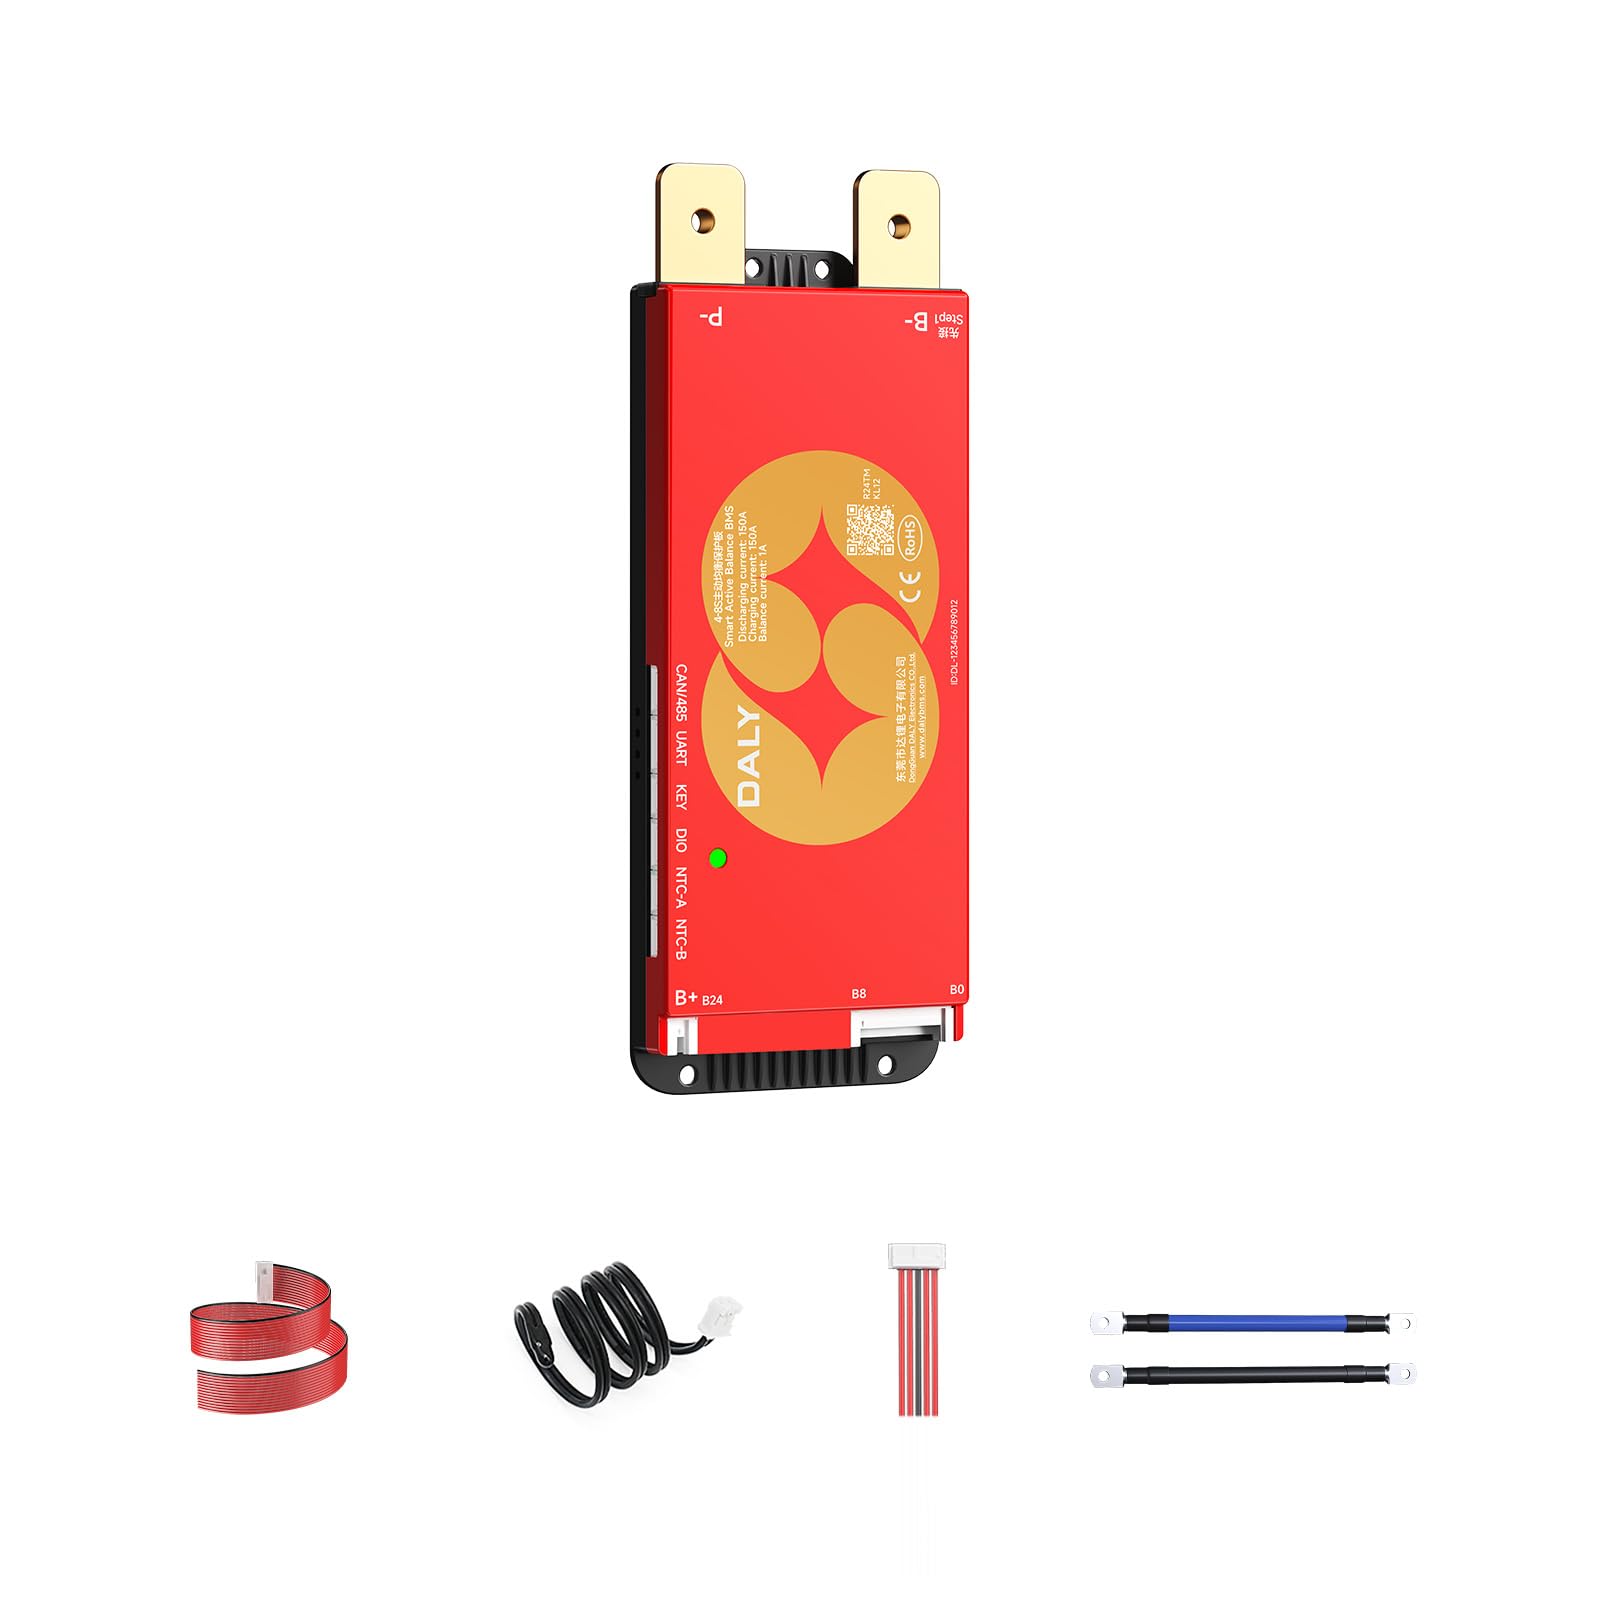
Daly 4S 100A Smart BMS (ASIN: B08L3Z5K4P)
Built-in balancer (100mA) maintains balance long-term post-manual process.
Best for: Install after balancing for ongoing protection.
Price Range: $45-60