For small farm owners, a 3-point hitch rotary tiller is a game-changer for soil preparation, turning hard ground into seed-ready beds quickly. But many skip assembly due to intimidation, paying $200+ for dealer setup. This guide empowers intermediate users to do it themselves safely and correctly.
You'll learn everything from unpacking to final test-fitting on your compact tractor (like John Deere 1-2 series or Kubota BX). Expect basic mechanical knowledge, lifting up to 50lbs, and following torque specs. The process takes 2-4 hours depending on model size (48-60 inches wide).
By the end, you'll have a fully assembled tiller ready for your first field pass, with tips to avoid downtime during planting season.
▸What You'll Need
- •3-Point rotary tiller kit (e.g., 48-60" model with frame, gearbox, PTO shaft, tines, bolts/nuts)
- •1/2-inch drive socket set (metric and SAE, 3/8" to 19mm)
- •Torque wrench (50-200 ft-lbs range)
- •Adjustable wrench or crescent wrench (12-inch)
- •Grease gun with lithium or EP2 agricultural grease
- •Safety glasses and heavy-duty work gloves (required)
- •Jack or engine hoist for heavy lifting (optional but recommended)
- •Level surface and wheel chocks for workspace
- •Penetrating oil (e.g., WD-40) for rusty parts (optional)
Estimated Time: 2-4 hours
Difficulty: intermediate
▸Step-by-Step Instructions
Step 1: Prepare Your Workspace and Gear
Choose a flat, well-lit area like a garage or barn floor, at least 10x10 feet. Chock wheels if working near your tractor. Lay out a tarp to catch small parts and keep things organized.
Don safety glasses and gloves immediately—flying bolts or sharp tines are common hazards. Review the manufacturer's manual (included in kit) for model-specific torque values and diagrams. Why it matters: A safe, organized space prevents injuries and lost parts, ensuring smooth progress.
Expect a clean setup ready for unpacking; success looks like all tools within arm's reach and manual open to parts list.
💡 Tips:
- •Work with a partner for heavy lifts to avoid strains.
- •Photograph the workspace before starting for reference.
⚠️ Warnings:
- •Never assemble without PPE; metal shavings can cause eye damage.
Step 2: Unpack and Inventory Parts
Carefully open the crate or boxes, removing frame, gearbox assembly, PTO shaft, tine sets (usually 20-30 blades), hitch pins, bolts (grade 8 marked), and shields. Lay parts in manual's grouped sections.
Check against the parts list—count tines, verify bolt lengths (e.g., 1/2-20 x 3" for frame). Inspect for damage like bent tines or cracked gearbox housing; contact supplier if issues. This step prevents mid-assembly halts.
Success: All parts accounted for, no defects, ready to build.
💡 Tips:
- •Use zip ties to bundle matching bolts/nuts.
- •Note serial numbers for warranty.
⚠️ Warnings:
- •Missing parts? Don't improvise—order replacements first.
Step 3: Assemble Main Frame and 3-Point Hitch
Position the main deck frame upright. Bolt the lower hitch arms (cat 1 or 2 pins) to frame brackets using 5/8" grade 8 bolts, torquing to 100-120 ft-lbs per manual.
Attach the upper link swivel bracket to the top center. Align all holes perfectly—use a punch if needed. Why: Proper hitch alignment ensures level tilling and prevents tractor strain.
Expect sturdy frame standing alone; test wiggle—minimal play means success.
💡 Tips:
- •Apply anti-seize to bolts for future disassembly.
- •Torque in a star pattern for even tension.
Step 4: Install Rotor Shaft and Tines
Slide the main rotor shaft through frame bearings. Bolt on tine holders (spiders) at intervals per manual (e.g., every 7-8 inches).
Hammer or press tines onto shaft bolts, alternating left/right curve for proper chopping action—tighten nuts to 60 ft-lbs. Grease shaft bearings now. This core step creates the tilling action.
Success: Shaft spins freely by hand, tines securely locked without wobble.
⚠️ Warnings:
- •Tines are sharp—wear thick gloves; wrong orientation dulls them fast.
Step 5: Mount Gearbox and Chain/Drive
Hoist or jack the gearbox onto frame mounts, aligning input shaft with rotor chain sprocket. Secure with 4-6 heavy bolts (torque 150 ft-lbs).
Connect drive chain, adjusting tensioner to 1/2-inch slack. Install chain guard. Purpose: Transfers PTO power efficiently.
Expect smooth chain movement; no binding.
💡 Tips:
- •Lube chain lightly before tensioning.
Step 6: Add Shields, Skids, and Tailgate
Bolt on side shields and rear tailgate/deflector using self-tapping screws or bolts. Attach adjustable skid shoes to frame bottom for depth control.
These protect operator and allow 4-8 inch till depth. Tighten all to spec.
Success: Full enclosure, skids level.
Step 7: Attach and Adjust PTO Shaft
Slide PTO shaft onto gearbox spline, securing with yoke pin/clip. Cut to length if too long (measure collapsed/extended on tractor first—subtract 3-6 inches for safety).
Add slip clutch if included. Rotate to check clearance.
Why critical: Wrong length causes damage; success is full stroke without bottoming.
⚠️ Warnings:
- •Always remove PTO from tractor before cutting.
Step 8: Lubricate and Final Checks
Pump grease into all 8-12 zerks (gearbox, bearings, chain)—10 strokes each. Recheck all bolts for torque.
Visually inspect alignments, spin rotor freely. Test fit on tractor: Attach hitch, level, ensure PTO engages.
Run brief low-RPM test. Ready for field!
💡 Tips:
- •Mark zerk locations for maintenance.
▸Pro Tips
- •Measure your tractor's 3-point lift height first to confirm model compatibility.
- •Use a paint pen to mark torque values on visible bolts for quick checks.
- •Assemble on cardboard boxes for easier cleanup and part protection.
- •For rusty factory parts, soak bolts in penetrating oil overnight.
- •Invest in a cordless impact wrench (20V+) to speed torquing by 50%.
- •Store extra shear pins with the tiller for field emergencies.
- •Align tines in a slight helix pattern for smoother soil flow.
▸Common Mistakes to Avoid
- •Skipping inventory—leads to wasted trips to hardware store mid-build.
- •Incorrect PTO length—causes shaft failure or gearbox damage on first use.
- •Overtorquing hitch bolts—strips threads, weakens frame.
- •Ignoring grease zerks—seizes bearings after 10 hours of use.
- •Misaligning tines—creates uneven tilling and excessive vibration.
▸Troubleshooting
Problem: PTO shaft binds or is too short/long
Solution: Remeasure tractor lift range collapsed/extended, recut with tube cutter leaving 3" overlap. Seek pro if splines damaged.
Problem: Rotor rubs frame or gearbox
Solution: Check shaft bearings for flat spots; realign frame bolts. Loosen skid shoes for clearance.
Problem: Hitch won't level on tractor
Solution: Adjust turnbuckles on lower links; verify cat 1/2 pins match. Consult tractor manual.
Problem: Chain slips under load
Solution: Retension to 1/4-1/2" slack, replace if stretched. Add lube.
Problem: Excessive vibration during test
Solution: Balance tines (equal number each side), torque all nuts. Professional weld check if frame bent.
DEWALT 108-Piece Mechanics Tools Kit (ASIN: B00IL8TWIU)
Complete SAE/metric sockets and ratchets handle all tiller bolt sizes precisely, reducing stripping risk.
Best for: Tightening frame, hitch, and tine bolts during steps 3-6.
Price Range: $70-$90
EPAuto 3/8in. Drive Click Torque Wrench (ASIN: B07D3MRVHW)
Accurate 10-80 ft-lbs for tines plus adapter for higher hitch torque; prevents over/under-tightening.
Best for: All torquing steps, especially gearbox and hitch.
Price Range: $35-$45
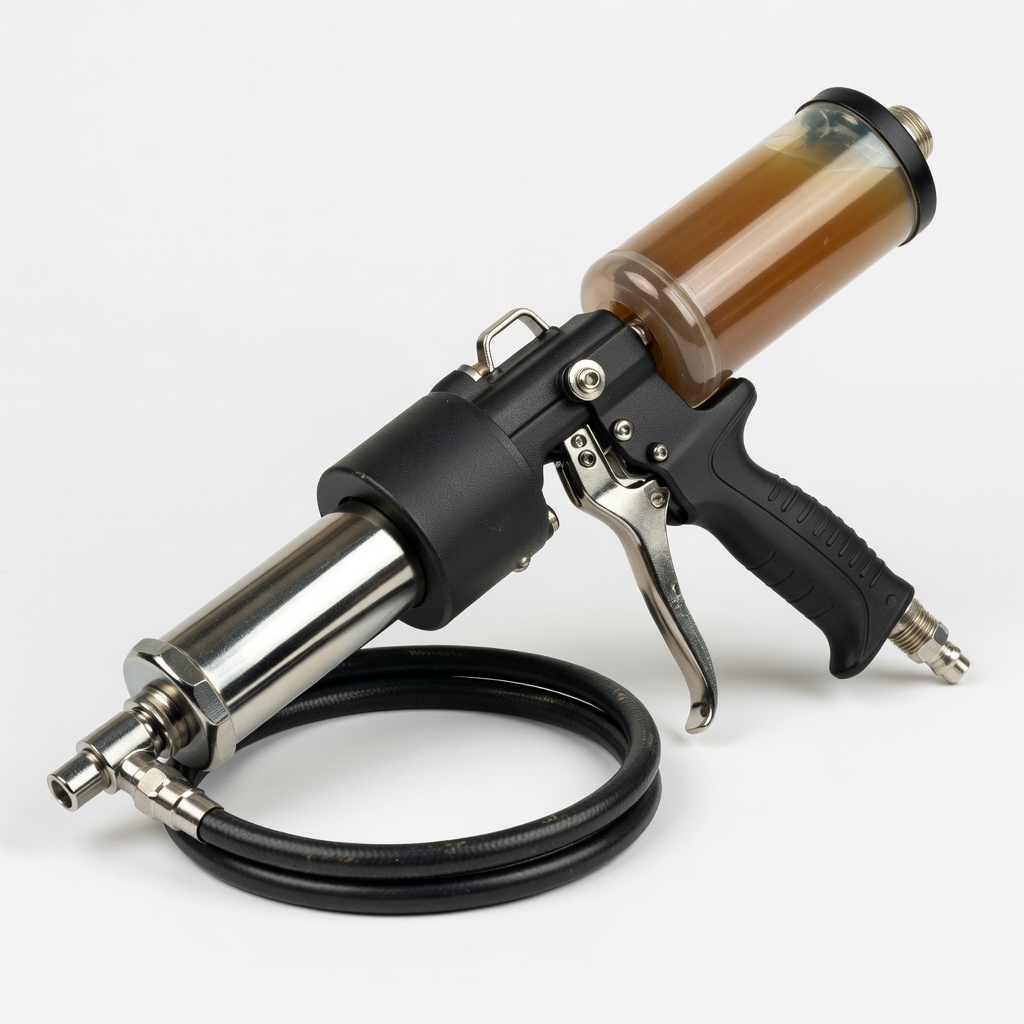
Astro Pneumatic 3057 Heavy-Duty Grease Gun (ASIN: B0002SR6O0)
High-pressure for ag zerks, holds 14oz grease—pumps without air pockets for full lube.
Best for: Final lubrication step 8 and ongoing maintenance.
Price Range: $20-$30
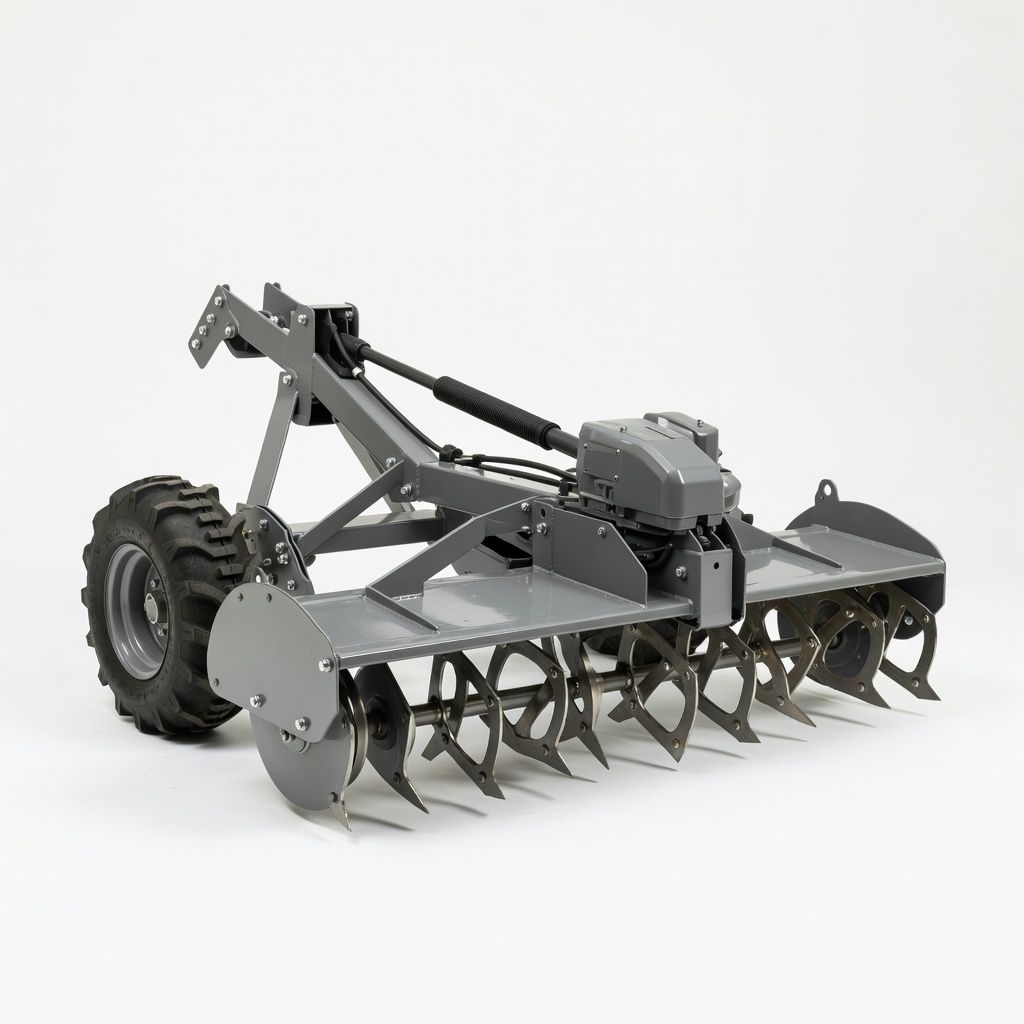
M-K 48in. 3-Point Rotary Tiller (ASIN: B07G5L1Z1G)
Ideal small farm size, Cat1 hitch, reliable gearbox—easy assembly kit for 15-40HP tractors.
Best for: Base machinery for this guide; tills 4-8in deep efficiently.
Price Range: $900-$1100
NoCry Safety Glasses (ASIN: B07CWQJD8Z)
Anti-fog, wraparound ANSI-rated protection against metal chips during tine install.
Best for: All steps, especially hammering tines.
Price Range: $12-$18